Supplies Needed:
My striped line brush which you can get Here.
Script: Pattern Extend by Joske which you can download from Here. Extract the script to your Scripts-Restricted folder
MuRah's Meister Copies: Download the plugin Here.
I have 2 sets of different line brushes, which you can download from:
Set #1
Set #2
These brushes are all 500 pixels in length, which, unfortunately, is the size limit for psp brushes, at least it is for PSP8 which is what I use. This tutorial will show you how to extend them using a script to give you a perfectly seamless overlay of any size for creating background papers. If you haven't already, install your brushes now.
** If you are installing all of these brushes, copy and paste all into your Brush folder, wherever that may be on your computer. Each PSP brush always has 2 files for one brush. One will be called BrushTip_BrushNameHere.PspScript and the other is BrushNameHere.PspBrush. If you are installing just a single brush (we are going to be using SK Lines 17 for this tutorial), then you have to copy both of these files into your brush folder (BrushTip_SK Lines 17.PspScript and SK Lines 17.PspBrush).
** When the rest of this set becomes available for a freebie on my blog, these are the dimensions of each brush. It is easier and a lot less work for you if you know the exact dimensions of the brush we are going to extend, so here are the dimensions for brushes 1 to 18:
SK Line Brush 01: 8 x 500
SK Line Brush 02: 14 x 500
SK Line Brush 03: 23 x 500
SK Line Brush 04: 16 x 500
SK Line Brush 05: 15 x 500
SK Line Brush 06: 18 x 500
SK Line Brush 07: 25 x 500
SK Line Brush 08: 35 x 500
SK Line Brush 09: 11 x 500
SK Line Brush 10: 17 x 500
SK Line Brush 11: 21 x 500
SK Line Brush 12: 26 x 500
SK Line Brush 13: 23 x 500
SK Line Brush 14: 25 x 500
SK Line Brush 15: 34 x 500
SK Line Brush 16: 25 x 500
SK Line Brush 17: 45 x 500
SK Line Brush 18: 30 x 500
Let's get started.....
1. Open up a new transparent image 45 x 600. I know our brush is 500 pixels in length, but it's easier if we have a bit of space at the top and bottom.
2. Set your foreground colour to black and go up to Layers, New Raster Layer. Position your line brush evenly at the edges of your canvas and click once. You should have this:

Now, since we are only going to be extending this image vertically, it does not matter if there is extra space at each of the sides, but there CAN NOT be any extra space at the top or bottom or it will show in your final product. See example below

3. So now we need to crop the space away. Click on your Crop tool and position it so that it is just going to crop off a tiny bit from the top and bottom edge. See example below.
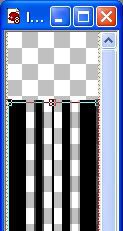
4. Make sure your active layer is the one with your brush on it. Go up to the Scripts panel and find PatternExtend-joske and select it from the drop down menu.
*If you are not familiar with Scripts, look up at the top of your screen for the section that looks like this

5. Next, push the arrow pointing to the right to start the script. The first box that pops up is the resolution box. I got into the habit of setting it at 300 so that's what I usually do. Pick your resolution and click OK.
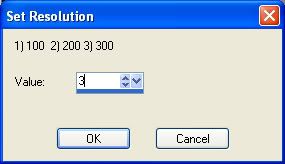
6. We are only extending this vertically, so set the number to 2 for just vertical.
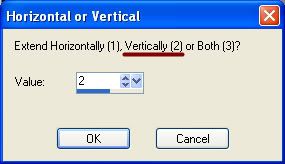
*This next part is where we set the new height. The script uses inches, and I usually just use pixels so it took a bit of trial and error to find out what it converted to.
7. Set this next number to 3 for Custom.
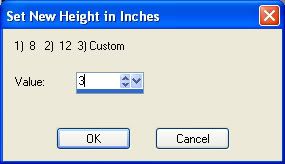
*Another box pops up and you can input whatever height you want. If you are like me and use pixel values, setting the custom number to 1 will give you a height of 300, setting it to 2 will give you a height of 600, setting it to 3 will give you a height of 900, and so on and so on. It uses a mulitple of 3.
8. We are going to make this 1800 pixels high, so set your custom number to 6 and click OK.
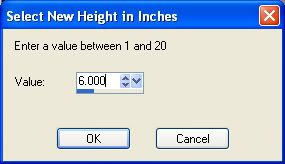
*This next box shows you the dimensions that you have chosen. 45 pixels wide, 1,800 pixels wide, with a resolution of 300. If you want to change anything, you can do so now by typing in new numbers and clicking OK.
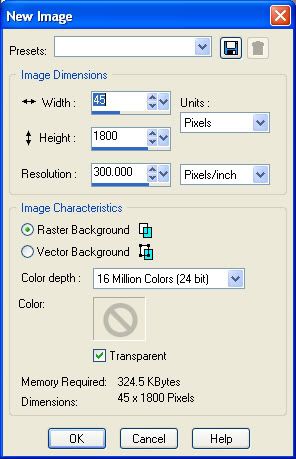
9. This next little pop up tells you to find your original image in the materials box. When you click on OK, your foreground materials box should pop up automatically with the pattern tab open. From the drop down box, find your brush image you are working on here and click OK.
*The script will automatically extend your brush pattern to the dimensions that we previously had set. You should now have a 45 x 1800 pixel even strip :) If yours is not seamless vertically, then you may have left a space in there when you cropped it.
*If you are continuing on to the next part, don't delete your brush off of your canvas.
*That's how to extend a Line Brush vertically. You can either use it this way and copy and paste it onto a new, larger background paper, spacing it that way OR continue on and I'll show you how to entend it evenly across the page using this script, and also another way using MuRah's Meister Copies plugin.
Extending the Brush Horozontally Using Pattern Extend:
Since this brush is already the height that we want it, we aren't going to touch that. We just need to reproduce it across our page horozontally. In order to do that, we need to decide how much space we want inbetween each set of stripes.
1. Go up to the Image tab at the top and then down to Canvas. At the top of the box that pops up is our original width and height of our canvas, 45 x 1800. Below that is where we type in what we want our new canvas to be. To make things easier, in the width column, change it to 45 right now. That way, we just add on the number of pixels we want and there is no confusion. We are leaving the Height at 1800, but now we need to decide how many pixels we want in between each of our block of striped lines. I'm going to choose 75 pixels. See picture below.
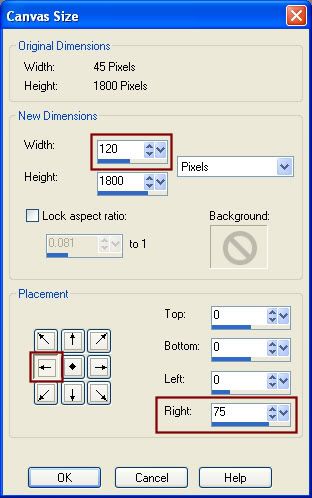
2. So, I would add 75 onto the 45 in the width column, which would give me a number of 120 in the width column. Make sure the Lock Aspect Ration is unchecked because we are only changing the width. Don't hit ok yet.
3. In the next part where it says Placement, click the arrow I've highlighted in red. The number 75 should appear beside the column that says Right. That means that we are going to have 75 pixels of space to the right of our line brush on the canvas. Now click on OK.
Yours should now look like this:
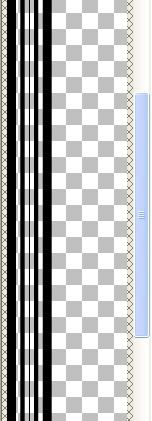
This is where we use the Pattern Extend script.
4. Go up to the Script tab, it should still have the Pattern Extend script in it and push the arrow pointing to the right to start it up.
5. Choose your resolution
6. Choose 1 for the horozontal option.
7. Choose 3 for the custom option.
8. Choose your new width. If you are using pixels, like in the vertical tutorial, 1 will give you a page width of 300, 2 will give you a page width of 600 ect....... I want an 1800 x 1800 page, so I'm going to choose 6.
9. Find your canavs in the patterns tab and hit ok.
You should now have an 1800 x 1800 page with evenly spaced stripes across :)
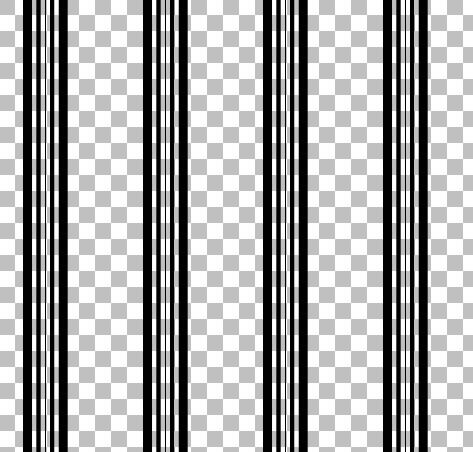
*You can also go up to the Edit tab, choose Copy, and paste that onto a blank 1800 x 1800 page and it will center it so that there is equal space at each of the sides if you like that look better.
Extending Horozontally Using MuRah's Meister Copies:
This is a much quicker way to spread it across the page once you have extended your brush to the verticle length you wanted it.
1. Open up a new transparent canvas 1800 x 1800.
2. Copy and paste your 1 extended brush onto the page. It will automatically be centered in the middle of the canvas.
3. Go to the Effects tab, then to Plugins, then find MuRah's Meister, then to Copies. Put your settings like the ones in the picture below
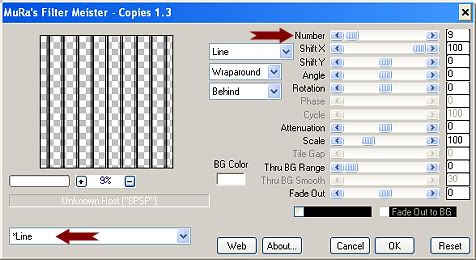
*At the top, I've indicated the Number slot with a red arrow. If you change that number to something higher, more copies of your line brush will appear on your page. Change it to something lower than 9, and less will appear. Just hit OK when you are satisfied, and you are done :)
The full set of 18 Line Brushes are now up on my blog. You can download them from HERE
Thank you so much for the brushes and for the tutorial. I downloaded the brushes a while ago and just now got around to using them. For some reason I was totally lost and now I have a beautiful background :)
ReplyDeleteYou write very well.
ReplyDeleteShauna, if you are like me, you have this set to come to you when someone comments. I hope so anyway. LOL I need help! LOL I am so NEW to PS...and I want to learn it so much. I printed your tuts and saved the supplies...now in trying my first tut...I'm stuck in the 1st paragraph. Keep in mind...I AM A GREEN HORN when it comes to this proggie. Where would I find the Custom Shapes tool? I need to get the BASIC CIRCLE...and I haven't a clue where/how to do this. HELP me PLEASE??? email me if you would prefer... candiem@gmail.com
ReplyDeleteThanks sweetie, this is so nice of you to do these tuts for us!
hugs, Candie
You need to take part in a contest for one of
ReplyDeletethe most useful websites on the web. I am going to highly recommend this web
site!
Feel free to surf my page - http://kohls-printable-coupons.net
Excellent way of explaining, and fastidious article to obtain
ReplyDeleteinformation regarding my presentation focus, which i am going to
deliver in institution of higher education.
Here is my weblog: Psn Code Generator
A motivating discussion is definitely worth comment. There's no doubt that that you ought to publish more on this subject, it may not be a taboo subject but usually people don't discuss such topics.
ReplyDeleteTo the next! Best wishes!!
Review my web blog :: Candy Crush Saga hack
It is not my first time to pay a visit this website,
ReplyDeletei am browsing this web site dailly and get good information
from here all the time.
Also visit my weblog - Generateur de Code PSN ()
I've been browsing on-line greater than three hours as of late, but I by no means discovered any fascinating article like yours. It is pretty price sufficient for me. In my view, if all website owners and bloggers made just right content material as you did, the web shall be a lot more helpful than ever before.
ReplyDeletemy website - your anchor Text
I've been surfing online more than 4 hours today, yet I never found any interesting article like yours.
ReplyDeleteIt is pretty worth enough for me. In my view, if all web owners
and bloggers made good content as you did, the net will be
a lot more useful than ever before.
My webpage - injured in car accident
Thanks in support of sharing such a pleasant thinking, piece of writing is fastidious,
ReplyDeletethats why i have read it fully
Here is my web-site worked
e cigarette health, electronic cigarettes, ecig, ecigs, ecigarette, e cigarette
ReplyDeletemichael kors outlet
ReplyDeletemichael kors outlet
2015 michael kors outlet
michael kors outlet stores
michael kors outlet online sale
michael kors outlet online sale
Michael Kors Wallet
michael kors sale
michael kors purses
michael kors handbags
michael kors bags
michael kors tote
michael kors uk
macys michael kors
michael kors outlets
michael kors factory
Michael Kors Flagship Store
Michael Kors Flagship Store
Cheap Michael Kors Bags
Michael Kors Drawstring Bags
Michael Kors Bracelet
Michael Kors Necklace
Michael Kors satchels
Michael Kors shoulder-bags
ninest123 16.02
ReplyDeletemichael kors, tiffany and co, replica watches, ugg boots, louboutin, oakley sunglasses, nike outlet, michael kors outlet, gucci outlet, louis vuitton, ray ban sunglasses, jordan shoes, tiffany jewelry, oakley sunglasses, prada handbags, oakley sunglasses, longchamp, replica watches, chanel handbags, christian louboutin outlet, ray ban sunglasses, polo ralph lauren outlet, michael kors outlet, nike free, louis vuitton outlet, louis vuitton outlet, louis vuitton, burberry, polo ralph lauren outlet, longchamp outlet, ugg boots, michael kors outlet, cheap oakley sunglasses, tory burch outlet, nike air max, burberry outlet online, oakley sunglasses, nike air max, louboutin shoes, longchamp outlet, ugg boots, michael kors outlet, prada outlet, michael kors outlet, uggs on sale, louis vuitton, ray ban sunglasses, louboutin outlet, ugg boots
canada goose uk, moncler outlet, moncler, canada goose outlet, louis vuitton, louis vuitton, wedding dresses, sac louis vuitton pas cher, links of london, barbour jackets, montre pas cher, lancel, supra shoes, canada goose outlet, canada goose, louis vuitton, pandora jewelry, replica watches, converse outlet, moncler, ugg boots uk, swarovski crystal, bottes ugg, toms shoes, louis vuitton, thomas sabo, pandora charms, canada goose, moncler, juicy couture outlet, ugg,ugg australia,ugg italia, canada goose, ugg pas cher, swarovski, pandora jewelry, doke gabbana outlet, doudoune canada goose, moncler, moncler, ugg,uggs,uggs canada, barbour, marc jacobs, moncler, hollister, canada goose, juicy couture outlet, pandora charms, karen millen, moncler, coach outlet
ReplyDeleteninest123 16.02
yeezy shoes
ReplyDeletevan cleef arpels
michael kors factory outlet
jordan retro
tory burch shoes
nike lebron 14
adidas yeezy
pandora charms
light up shoes
light up shoes
fitflops sale
ReplyDeleteoakley sunglasses wholesale
ugg sale
mlb jerseys wholesale
ugg sale
christian louboutin
moncler outlet store
kate spade sale
true religion outlet store
fitflops sale