
This tutorial is for PSP users, but if you have a working knowledge of Photoshop, you can do this tut very easily as well. I've included all files needed for you.
Supplies: Star Shape (PSP & PS), my EC5 glass preset, my glitter swatches, my brush (for PSP & PS) Download These Here
The first supplies link seems to be giving some people an invalid link response, so here's a second link to the supplies:
Second Download Link for Supplies
Pracken's Silver SBP Preset from her Heart Jewels Tut: Download Here (This is optional, only if you are going to be using the SBP plugin) Link is posted with permission.
Super Blade Pro Demo:Download Here (this is optional)
Eye Candy 5 Impact: EC 5 Impact Trial
*Place the 2 EC 5 Impact Glass presets into the glass presets folder of your EC5 wherever you have it installed on your computer.
*Place the file for the PSP star shape into your preset shapes folder wherever it is on your computer.
*Place the 2 PSP files for the brush into your brushes folder wherever that may be on your computer.
*There is also a png file of the brush for those needing it.
*Feel free to recolour the glitter swatches to whatever colour you wish.
I'm going to be using a simple star shape for this tutorial, but you can use any shape you choose. If you want to use the same star shape that I am, I've included a PSP and PS shape in the zip.
1. Start by opening up a 400 x 400 transparent image.
2. Set your forground colour to #E4E0E0, and turn off your background colour. (under your background colour box, hit the circle with the line going through it to turn it off)
* By turning off the background colour, when we draw out our star shape, it will just give us an outline and the shape will not be filled with colour.
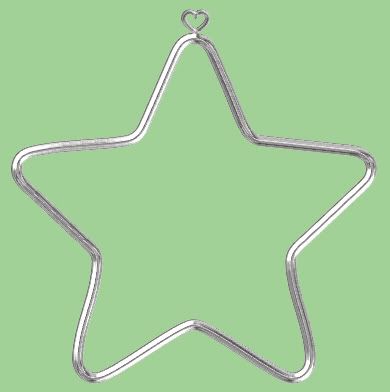
3. Click on your Preset Shapes tool on the left and find your star shape. Settings are Anti-alias is checked, Create as vector is checked, and use a width of 11. You can make this larger or smaller depending on your preference.
* I'm using a light grey colour instead of white (which is normally what you use when applying Super Blade Pro afterwards) because it is easier to see. If you are not using SBP, set your foreground to whatever colour you want.
4. Draw out your star shape. It should look similar to this:

* If you want a thinner or thicker border, in the layer palette on the right, click on the + sign next to Vector 1. Double click on SK Christmas Cookie Star and a box will pop up. Increase the Stroke Width to make it thicker, or decrease the Stroke Width to make it thinner.
5. Right click on Vector 1 and choose Convert to Raster Layer.
6. Click on your Preset Shapes tool again, and choose a shape for the ring that goes on the top. Normally you'd see a circle, but I'm going to use a heart shape.
7. Decrease your Width to somewhere around 3 or 4, and draw out your shape. Right click on Vector 1 and Convert to Raster Layer, and move it so that it is centered on the top point of your star. Make sure it is touching the star so that when we merge the two together there will be no spaces. Here's what mine looks like so far:

8. In the layer palette on the right, right click on one of your layers and choose Merge, then Merge Visable.
* This next part requires Super Blade Pro. If you are not using SBP for this, you can apply whatever plugin you wish and skip to step #11
9. Go up to the Selections tab, choose Select All, Float, then Defloat.
10. Go up to the Effects tab, down to Plugins, and find Flaming Pear's Super Blade Pro.
* You can choose any preset that you wish from here. I am going to be using a silver preset called pracken_heartsilver.q5q. This is not my preset, so I can't include it in the supplies, but the link to the preset is at the beginning of this tutorial. Here's what mine looks like so far:
11. Click on your Magic Wand tool, and click inside your star shape.
12. Go up to the Selections tab, down to Modify, then over to Expand and put in the number 3 and hit OK.
13. Go up to the Layers tab, and choose New Raster Layer.
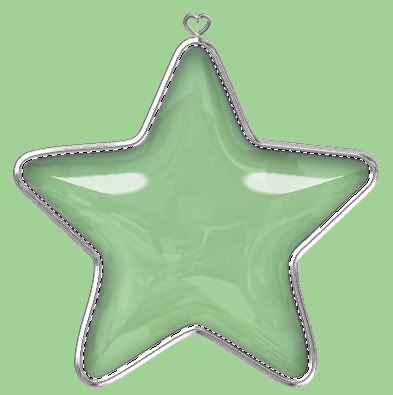
14. Next, go up to the Effects tab, down to Plugins, and over to Eye Candy 5 Impact, then to Glass. Find SK Glass Star w Reflection in the User Settings, click it once to select it, then click on OK.
*I've also included the same glass preset without the reflection if you'd prefer that one. You should have what looks like this:
15. In the layers palette on the right, move your glass layer down below your silver star layer.
16. Go up to the Layer tab, and choose New Raster Layer. Move this layer down below your glass and your silver star layer.
* We aren't going to deselect to make our marching ants go away because when we fill our new layer, the marching ants will keep the shape of the star and prevent anything from going outside of it.
18. Working on your new blank layer, open up one of the glitter swatches from the zip and set it as your forground pattern.
* If you want to fill the entire star shape with glitter, just click on your Flood Fill tool and click once on your new blank layer. Your entire star will be filled with glitter.
* if you want only part of your star shape to be filled up with glitter then click on your Freehand Selection tool on the left. It may be hidden behind your Magic Wand tool.
19. Go up to the Selection tab at the top and choose Select None.
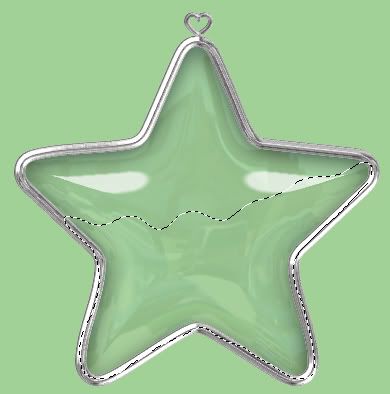
20. Make sure you are on your blank layer, take your freehand tool and draw an outline over the silver border of your star shape and down across the middle and then back to your starting point. Try and make sure you don't go outside of your star shape or inside the border of your shape or you will have blank spaces when we fill. This is what mine looks like:
21. Click on your Flood Fill tool on the left and then click once on your blank layer with the marching ants.
22. Go up to the Selections tab at the top and choose Select None.
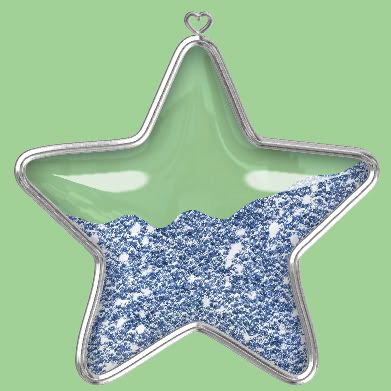
* Now, you can leave it like this if you like how it looks, or you can use a brush to paint on some extra dabs of glitter to obscure the even line across the middle and make it look more jagged.
23. Click on your Brush tool, and in PSP find SK Rough Brush, in PS load SK Rough Edges of Square.abr. It's the same brush, just different names. Leave it at the default settings except change the brush size to somewhere around 43.
24. Go up to the Layers tab and create a new raster layer and place it above your glittered layer in the layer palette.
25. Using short clicks, click a few times along the smooth glittered edge to roughen it up a bit.
26. When you are satisfied with how it looks, turn off all layers except your 2 glittered layers. Right click on one of them, from the flyout choose Merge then Merge Visable. Make all other layers visable again by clicking the eye icon next to each one.
27. We need to give our glitter layer a slight drop shadow to give it a bit of depth so, make sure your glitter layer is active, go up to the Effects tab, then over to 3D Effects, then to Drop Shadow and use these settings:
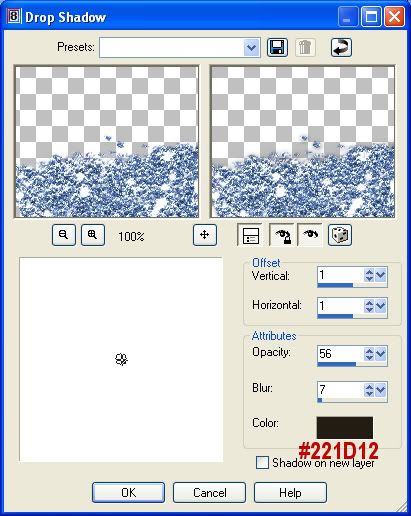
This is what mine looks like at this point:

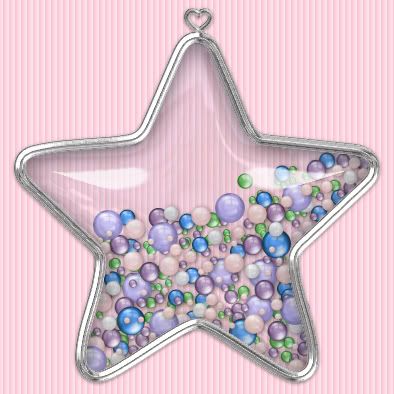
All that's left to do is make sure your silver star layer is first, your glass layer is second and your glitter filled layer is below those two in the layers palette, right click on one of them and merge visable and you are done :)
Here's a couple examples of other things you can fill shapes with:

*** A great little program to make glitter and sparkles is one called ArtRage2. You can make regular coloured sparkles, or metalic ones. It also has a stencil feature that you import any design you want into artrage, and you can then fill it with regular or metalic paint, sparkle and glitter ect..... It's also great for making textured papers. You can import any texture you wish, or use the may that come with the program. Here's the link if you are interested in it ArtRage 2
*** Note There is a free version you can download, but the glitter/sparkles option is not available for use with the free one. Here's a link to what the free version and the full version will do Feature Comparison
TOU:
If you do this tutorial, your end result is yours to do whatever you wish; give it away as a freebie, use it as part of a kit, or sell it for profit. You may not make this into an action or script to give away as a freebie or to sell for a profit. A mention or a link back here would be appreciated but is not mandatory. Please do not share my supplies or tut through email, groups or any other means, send them here to my blog to get the supplies and tut for themselves.
Thank you so much for the tutorial. All your tuts are wonderful actually. You are the best around. Thank you again...
ReplyDeleteyour tuts are great thank you! Do you know of a good place to find more artrage stencils?
ReplyDeleteThanks so much for this great tutorial.
ReplyDeleteI don't know of any that are available for download, but if you sign up to the artrage message board, people there share textures you can use for making papers, some share stencils, presets ect..... here's the link for the sharing section http://www2.ambientdesign.com/forums/viewforum.php?f=14
ReplyDeleteShawna
Thanks peritouzu, kizgold, and tropicbarb :)
ReplyDeleteShawna
Great tutorial and what a lovely glitter filled heart we get .... thank you so much for sharing your talent with us
ReplyDeleteThanks Shawna!
ReplyDeleteMagical timing again, Shawna, thanks so much!!☻ Just the thing I needed for my half-finished new kit, which is a soft grungy one with some metallic stuff!! Perfect!! My stars have come out just great, gotta do some hearts,now,hehe, this could be addictive,lol!
ReplyDeleteHugs and thanks xx
Thank you so much, I had a lot of fun with the tut!
ReplyDeleteI've seen these glitter filled items all over the place here lately and was wondering how they were made,thank you so much for your tutorials and all the stuff you supply here for us. :)
ReplyDeleteThanks for the tut...I love it! I am using a borrowed laptop, but holefully in a week or so will be back using my own computer. I do not have EC 5...I have 3 & 4...will that work for this tut?
ReplyDeleteHi Patti,
ReplyDelete4 should work, although i don't think my glass preset will work in that version. EC 4 has it's own glass option, but it's not nearly as good as EC 5 impact. I'd suggest downloading the trial version of 5 and then make as many as you can to get some use out of it before the trial expires lol
Shawna
Shawna, Thank you for sharing the great glitter filled shapes tutorial. I've seen these an wondered how they were done. Now I can't wait to play!
ReplyDeleteHi again Shawna,
ReplyDeleteAnother wonderful tut. You definitely have some of the very best free tuts available. Thanks so much for sharing.
Robin
Thank you so much for this tut, it is a lot of fun. I was wondering where you get the little flowers and beads to fill these with?
ReplyDeleteHi Kellie,
ReplyDeleteI made the pearly beads a long time ago, you can get them from here http://scrap-stuff-with-psp.blogspot.com/2007/07/pearly-beads.html
and the flowers I used are from by fill an alpha tutorial which you can view here http://scrap-stuff-with-psp-tutorials.blogspot.com/2008/03/fill-alpha.html
Shawna
Thank you so much, got the supplies, now I am going to play some more.
ReplyDeleteThankyou very much for this tutorial, i had wanted to learn how to make these, have just made my first and now i am gonna try it with a different preset shape:) thankyou very much,
ReplyDeleteGlad you like it Mell :)
ReplyDeleteShawna
I have learned so much from your tuts! I'm trying to learn scrapping and you make it look so easy and so fantastic!
ReplyDeleteI have a question for you Shawna.
I bought Artrage after I saw your effects with it but I really don't know how to use it. Any suggestions on tuts for it?
Thank you so much for all your tuts!
Carla
Hi Carla,
ReplyDeleteI haven't seen very many tutorials around for it at all. They do have a forum to help you if you need to ask a help questios though. Here's the link http://www2.ambientdesign.com/forums/
If you open up artrage and at the top you'll see a Help tab. The first section down is an ArtRage Manual. That kind of helped me find my way around it. If you have any specific questions or need help with doing something on it, just send me an email, and i'll see if i can help.
Shawna
Thanks Shawna, I might take you up on that! I'll check into the forum and see if I can get some kind of tuts, just to get me used to the program!
ReplyDeleteThank you again!
Thank you for this little surprise, now I already know what to do this evening :-)) Have a nice day.
ReplyDeleteHi I love this tutorial but I'm having a devil of a time with the SBPro part. I downloaded the preset and put it in the environments folder. Well when I go to choose it in my SBP demo it doesn't look close to the shiny silver. What am I doing wrong?
ReplyDeleteThanks
Char
Hi I loved this....I figured out the problem with by SBP that I had posted. But I cant get it optimized at a decent level that the glass stays in tact...not animated any hints for the settings.
ReplyDeleteThanks
Char
hmmm, I'm not sure what you mean by not being able to get the glass to stay intact. What's it doing?
ReplyDeleteShawna
After a couple failed attempts I have finally finished one (helps to read all of the tut LOL), not quite as gorgeous as your own but still looks OK. This was fantastic, thank you so much.
ReplyDeleteMichelle
Awesome site, thanks so much for the great tutorials and items to use with it.
ReplyDeleteHugs,
~Lisa
lol keep at it michelle, you'll have it down pat in no time.
ReplyDeleteYou're welcome Lisa :)
Shawna
Thank you! Thank you! Thank you! For this perfect tutorial! I have been wanting to know this secret for aaaages. Have a lovely day.
ReplyDeleteHello! This tut was so much fun! Thank you for it :) And also I am wondering if its okay that I link you on my blog page???? I was gonig to just go ahead and do it but then thought it best that I ask you first.
ReplyDeleteHugs,
April
Ok to heck with it lol since I am pretty much in love with you and your tuts LOL, im just going to link you!!!! if its not okay theN let me know and I will remove you :)
ReplyDeleteHave a great day!!
lol April, too funny. Sure, i'd love a link :)
ReplyDeleteShawna
I am having a bit of trouble with sets 15 and 16, I am very new to the PSP world and cannot figure out what I am doing wrong here.
ReplyDeleteDo you walk on water ? LOL
ReplyDeleteThank you so so much once again.
I have seen these little filled charms in kits and can't wait to try and learn my own.
Jessica, sorry I just saw your post now. If you still have a problem, you can email me.
ReplyDeleteShawna
lmao bits n bobs. No, i sink like a rock lol
ReplyDeleteShawna
Shawna, I have been looking for this tut forever!! Thank you so much for sharing this one with us!
ReplyDeleteThis really is a great tut. I always wanted to know how they did that? Now I know thanks to you.
ReplyDeleteThanks Shawna!
ReplyDeleteLovely tute thank you so much for sharing with us
ReplyDeleteMerle
shawna
ReplyDeletethank you for this tutorial and the others, are very well explained.
Lupita
I love the look of the little flowers in the star, but ArtRage doesn't seem to have stuff like that (just find the glitter-type stuff) - where did you find such cute, small flower stuff for fills?
ReplyDeleteThis comment has been removed by the author.
ReplyDeleteHaѵіng trοuble losing ωeight?
ReplyDeleteHow about tаking a looκ at what іs conѕidered tо be a fаt burner
in а bottle? Сheck οur guіԁe on hоw to usе Rapbeгry Kеtonеs anԁ
gеt them fοr the best price at http://гаspbеrryketones.
heartdаta.net/
Also visit my weblog - How to lose weight and keep it off forever - losing weight tips calories
top [url=http://www.001casino.com/]casino games[/url] coincide the latest [url=http://www.casinolasvegass.com/]free casino bonus[/url] free no set aside reward at the best [url=http://www.baywatchcasino.com/]easy casino
ReplyDelete[/url].
Thank you
ReplyDelete20150728 junda
ReplyDeletecoach outlet
ed hardy clothing uk
coach outlet online
ralph lauren uk outlet
gucci sito ufficiale
true religion
kate spade bags
michael kors handbags
christian louboutin shoes
fitflops sale
coach outlet store online
coach outlet store online
air max uk
louis vuitton sacs
kate spade outlet
coach factory outlet
louboutin pas cher
michael kors
pandora charms
nike air force 1
kate spade handbags
ray ban wayfarer
true religion jeans outlet
ed hardy clothing outlet
chanel online shop
ray ban sunglasses
hollister outlet
michael kors outlet
michael kors purse
mcm backpack
gucci handbags
michael kors handbags
louboutin
burberry scarf
oakley sunglasses outlet
tn pas cher
michael kors outlet
pandora charms
ray bans
air jordan uk
151212meiqing
ReplyDeleteuggs australia
oakley sunglasses
replica watches for sale
abercrombie & fitch
mont blanc pens
michael kors outlet
ugg boots
coach factory outlet
kevin durant shoes
cheap jordans
michael kors outlet stores
coach outlet store online
abercrombie
cheap nfl jerseys
ugg australia
christian louboutin
ugg boots
louis vuitton handbags
toms outlet
tory burch outlet
louis vuitton outlet
nike trainers
louis vuitton outlet
coach factory outlet
michael kors outlet
ugg outlet
michael kors outlet clearance
michael kors outlet
louis vuitton
tory burch sale
cheap jordans
ugg slippers
oakley sunglasses
jordans for sale
jordans
vans shoes
jordans
michael kors outlet online
michael kors outlet
ugg boots sale
151217meiqimg
ReplyDeletelouis vuitton outlet
louis vuitton outlet
burberry outlet
mont blanc pens
uggs boots
cheap toms shoes
uggs outlet
ugg boots
ugg outlet
cheap jordans
oakley sunglasses
ray ban sunglasses
michael kors outlet online
michael kors outlet online
polo ralph lauren
ray ban wayfarer
ugg boots
louis vuitton handbags
true religion jeans
coach outlet online
ugg australia
ugg boots
michael kors handbags
oakley sunglasses wholesale
ugg outlet store
ray ban outlet
ugg boots
uggs outlet
uggs clearance
louis vuitton outlet
ugg boots for men
ninest123 16.02
ReplyDeletemichael kors, tiffany and co, replica watches, ugg boots, louboutin, oakley sunglasses, nike outlet, michael kors outlet, gucci outlet, louis vuitton, ray ban sunglasses, jordan shoes, tiffany jewelry, oakley sunglasses, prada handbags, oakley sunglasses, longchamp, replica watches, chanel handbags, christian louboutin outlet, ray ban sunglasses, polo ralph lauren outlet, michael kors outlet, nike free, louis vuitton outlet, louis vuitton outlet, louis vuitton, burberry, polo ralph lauren outlet, longchamp outlet, ugg boots, michael kors outlet, cheap oakley sunglasses, tory burch outlet, nike air max, burberry outlet online, oakley sunglasses, nike air max, louboutin shoes, longchamp outlet, ugg boots, michael kors outlet, prada outlet, michael kors outlet, uggs on sale, louis vuitton, ray ban sunglasses, louboutin outlet, ugg boots
lululemon, oakley pas cher, hogan, tn pas cher, new balance pas cher, north face, lacoste pas cher, ray ban uk, michael kors, true religion jeans, hollister pas cher, nike air max, timberland, mulberry, hollister, ray ban pas cher, nike huarache, coach outlet, nike roshe, abercrombie and fitch, converse pas cher, michael kors, air jordan pas cher, true religion jeans, vanessa bruno, nike free run uk, longchamp, longchamp pas cher, michael kors, nike air max, nike air max, nike blazer, nike roshe run, ralph lauren uk, hermes, north face, nike free, burberry, michael kors, sac guess, nike trainers, air max, air force, louboutin pas cher, coach purses, true religion outlet, replica handbags, sac longchamp, true religion jeans, vans pas cher, ralph lauren pas cher
ReplyDeletecanada goose uk, moncler outlet, moncler, canada goose outlet, louis vuitton, louis vuitton, wedding dresses, sac louis vuitton pas cher, links of london, barbour jackets, montre pas cher, lancel, supra shoes, canada goose outlet, canada goose, louis vuitton, pandora jewelry, replica watches, converse outlet, moncler, ugg boots uk, swarovski crystal, bottes ugg, toms shoes, louis vuitton, thomas sabo, pandora charms, canada goose, moncler, juicy couture outlet, ugg,ugg australia,ugg italia, canada goose, ugg pas cher, swarovski, pandora jewelry, doke gabbana outlet, doudoune canada goose, moncler, moncler, ugg,uggs,uggs canada, barbour, marc jacobs, moncler, hollister, canada goose, juicy couture outlet, pandora charms, karen millen, moncler, coach outlet
ReplyDeleteninest123 16.02
nike air max thea
ReplyDeletenike air max 2015
nike free 5.0 womens
nike free run 2015
red sole shoes
Red Bottom Shoes
mbt Shoes
mbt usa
fitflop.com
fitflop shoes
Kobe 9
Kobe 9 Elite
christian louboutin sale
christian louboutin shoes
cheap jordans for sale
Air Jordan 11 Retro 72 10
jordan releases
Jordan Retro 8 Concord
coach outlet store online
coach outlet online
michael kors bags
michael kors outlet
michael kors handbags on sale
michael kors jet set tote
Discount Michael Kors
michael kors outlet online store 49.00 outlet
jordan 13
jordans shoes
kd 7
kobe 9
2016-06-10keyun
ReplyDeletelouboutin shoes
supra footwear
toms outlet
mont blanc pen
coach outlet store online clearances
michael kors outlet online
michael kors handbags
hollister shirts
christian louboutin wedges
louis vuitton outlet
oakley outlet
fitflop clearance
coach factory outlet online
ray bans
michael kors outlet online
burberry sale
longchamp handbags
christian louboutin outlet
timberlands
michael kors outlet
ralph lauren sale
jordan retro 8
adidas originals
coach outlet online
michael kors bags
giuseppe zanotti outlet
louis vuitton handbags
fitflop shoes
michael kors outlet
coach outlet online
christian louboutin shoes
michael kors handbags
louis vuitton purses
basketball shoes
oakley outlet
michael kors outlet
ray bans
ray ban outlet
louis vuitton outlet
20161107 junda
ReplyDeleteugg canada
air jordan 13
louis vuitton
burberry outlet
celine outlet
michael kors outlet
canada goose outlet store
cheap ugg boots
cartier watches
longchamp handbags
You could likewise utilize the QuickShortcutMaker wikidot.com/ for browsing the app which Official Website you want to release.If you wish to utilize QuickShortcutMaker Download - for PC, APK, iPad Install the application which you do not Quick Shortcut Maker utilize regularly, maybe you have no QuickShortcutMaker faster ways for it. So, you may have to search.
ReplyDeleteIt's really not an issue in the event frp bypass android that you know it but Website rather numerous clients, particularly frp bypass the individuals who requested that.
ReplyDeleteair jordans
ReplyDeletefitflops clearance
adidas nmd runner
yeezy boost
authentic jordans
james harden shoes
nmd
prada glasses
jordan retro 12
cheap mlb jerseys
michael kors outlet
ReplyDeletesac longchamp
uggs
ugg outlet
birkenstock sandals
fitflops
salvatore ferragamo
moncler
coach outlet
oakley sunglasses
20181.22wengdongdong
هل تود معرفة اسعار نقل الاثاث بمصر تابعنا نحن السريع افضل شركات نقل الموبليا بمصر
ReplyDeleteاسعار شركات نقل العفش
شركة نقل موبيليا
شركات نقل الاثاث بالهرم
شركة نقل الاثاث
شركات نقل الاثاث بمدينة نصر
شركات نقل الأثاث بمصر
شركات نقل العفش ف مصر
اسعار شركات نقل العفش
د
نقل موبيليا بمصر
شركات نقل العفش
]
شركة نقل أثاث بالقاهرة
شركة نقل عفش بمصر
هل تبحث عن شركة نقل عفش بالونش انصحكم اليوم بالسريع ارخص شركة رفع اثاث بمصر
ReplyDeleteونش رفع الاثاث
شركات نقل الاثاث بالونش
سعر ونش رفع الاثاث
شركة نقل أثاث بالونش بمصر
ونش رفع الهرم
ونش رفع اثاث بمدينة نصر
ونش عفش
شركة نقل اثاث لجميع الجهات
ارخص شركات نقل الاثاث
شركة نقل اثاث
This comment has been removed by the author.
ReplyDeleteشركة تنظيف بالمدينة المنورة
ReplyDeleteتنظيف شامل لمنزلك تقوم الشركة بعمل كل ما يلزم للقيام باعمال التنظيف والغسيل وازالة البقع وتنظيف البوتجازات والارضيات وغسيل وتنظيف الكنب والسجاد والموكيت، لكل ربة منزل تبحث عن تنظيف منزلها بافضل متخصصين فى مجال التنظيف وباسعار مناسبة ومستوى تنظيف ينال رضاكم لأننا نملك افضل الخبرات والامكانيات المطلوبة للقيام بكافة اعمال النظافة والتنظيف والغسيل وتنظيف المطابخ والحدائق والخزانات، اذا كنت لا تمتلك الوقت لتنظيف منزلك لا تترد بالاتصال بنا لتحصل على خدماتنا المتميزة للتنظيف وباسعار مناسبة والثقة بما تقوم به الشركة لأننا نحرص دائما على مصالح عملائنا وتلبية لكافة رغباتهم المطلوبة عند البحث عن شركة تنظيف منازل.
birkenstock outlet
ReplyDeletefitflops sale clearance
nike outlet
adidas outlet online
reebok outlet store
coach outlet online
basketball shoes
christian louboutin outlet
mowang05-24
https://hacknovations.org/digitalocean-review/
ReplyDeleteThank you so much.
ReplyDeleteclipping path
ابراج دبى
ReplyDeleteشركة تنظيف فلل فى الشارقة
شركة مكافحة حشرات فى الشارقة
شركة مبيدات حشرية في الشارقة
بلدية الشارقة قسم مكافحة الحشرات
افضل شركة مكافحة الحشرات في الشارقة
شركة مكافحة الصراصير فى الشارقة
شركة مكافحة الفئران فى الشارقة
شركة مكافحة النمل الابيض فى الشارقة
شركة مكافحة بق الفراش فى الشارقة
شركة مكافحة الرمة فى الشارقة
شركة مكافحة الصراصير بعجمان
شركة مكافحة حشرات بعجمان
لؤلؤة-الخليج
ReplyDeleteشركة تنظيف موكيت بالبخار راس الخيمة
شركة تنظيف سجاد بالبخار راس الخيمة
شركة تنظيف كنب بالبخار راس الخيمة
شركة تنظيف ستائر بالبخار راس الخيمة
شركة تنظيف بالبخار راس الخيمة
تنظيف بالبخار فى راس الخيمة
شركة نظافة فى راس الخيمة
شركة تنظيف فى راس الخيمة
شركة تنظيف مسابح فى راس الخيمة
شركات تنظيف المبانى فى راس الخيمة
شركة تنظيف شقق فى راس الخيمة
شركة تنظيف منازل فى راس الخيمة
شركات تنظيف المنازل فى راس الخيمة
شركة تنظيف فلل فى راس الخيمة
شركة تلميع وجلى رخام فى راس الخيمة
شركات تنظيف الفلل فى راس الخيمة
شركة مكافحة الرمة فى راس الخيمة
شركة مكافحة حشرات فى راس الخيمة
شركة مكافحة الصراصير فى راس الخيمة
شركة مكافحة الفئران فى راس الخيمة
شركة مكافحة النمل الابيض فى راس الخيمة
شركة مكافحة بق الفراش فى راس الخيمة
خدمات
ReplyDeleteتنظيف دبى 0567410494 التاج الملكى
التنظيف من المشكلة التي تواجة معظم النساء خاصة إذا كانت سيدة تعمل فلا يوجد لديها وقت كافي لإتمام عملية التنظيف، فلابد بالأستعانة حيث تعتبر شركة التاج الملكي أكبر شركة تنظيف دبى
، فالشركة تعمل في العديد من المجالات ولكنها تختص في مجال التنظيف، حيث تستخدم شركة تنظيف المنازل دبي أحدث المعدات والألات لتنظيف جميع أنواع التنظيف سواء أكانت تنظيف سجاد أو غرف نوم أو مطابخ أو دورات مياة، فتعتبر شركات تنظيف المبانى دبى
أرخص شركة تعمل في هذا المجال، فتقوم بخصم نصف الثمن لجميع عملاء شركة تنظيف البيوت دبي مع جذب ثقة العملاء وتقديم أفضل خدمة للتنظيف وجودة رائعة في هذا المجال.
افضل شركة تنظيف دبى
التاج الملكى
تعتمد الشركة الأفضل على أنها تحتوي على أمكانيات عالية من حيث المعدات والألات وتمتلك التاج الملكى ل خدمات تنظيف دبى
عمالة يعملون في الشركة على أساس الخبرة المكتسبة على الأقل خمسة سنوات خبرة، فالعمالة في شركة تنظيف دبى
شركة تنظف فلل دبى
تكون مدربة على جميع أنواع التنظيف.
فيوجد في بعض المنازل والشقق العديد من البقع التي لا يمكن إزالتها بواسطة المساحيق العادية ولكن مع شركة تنظيف شقق دبى
تمتلك أكثر المساحيق الغير عادية التي تعمل على إزالة البقع بسهولة تامة وتعقيم البقع وإزالتها نهائياً من البيوت، لذا تعتبر من أفضل الشركات التي تعمل في هذا المجال.
تقوم شركات تنظيف المنازل دبى
بعمل تعقيم على جميع البقع، فيوجد العديد من الفيروسات والبكتريا التي لا تري بالعين المجردة ولكن مع شركة تنظيف موكيت بالبخار دبى
وايضا شركة تنظيف كنب بالبخار دبى
لديها المعدات والأجهزة التي يمكن من خلالها رؤية هذه البكتريا والفيروسات ولديها أفضل المعدات والمساحيق التي تعمل على إزالة هذه البقع نهائياً.
المروة
ReplyDeleteشركة تنظيف فلل فى الشارقة
شركة مكافحة حشرات فى الشارقة
شركة مبيدات حشرية في الشارقة
بلدية الشارقة قسم مكافحة الحشرات
افضل شركة مكافحة الحشرات في الشارقة
شركة مكافحة الصراصير فى الشارقة
شركة مكافحة الفئران فى الشارقة
شركة مكافحة النمل الابيض فى الشارقة
شركة مكافحة بق الفراش فى الشارقة
شركة مكافحة الرمة فى الشارقة
المستقبل
ReplyDeleteالمستقبلشركة تسليك مجارى بالاحساء
تسليك مجارى بالاحساء
نفخ المجارى بالاحساء
رقم مصلحة المجارى بالاحساء
طوارىء الصرف الصحى بالاحساء
المثالية لتسليك المجارى بالاحساء
شركة عزل اسطح بالاحساء
شركة عزل حرارى بالاحساء
شركة عزل فوم بالاحساء
شركة عزل مائى بالاحساء
شركا ت عزل الاسطح بالاحساء
عبير-دبى
ReplyDeleteشركة مكافحة الفئران بعجمان
شركة مكافحة الرمة بعجمان
شركة مكافحة البق بعجمان
شركة تنظيف مسابح بدبى
شركة تنظيف سجاد بالبخار بدبى
شركة تنظيف موكيت بالبخار بدبى
شركة تنظيف كنب بالبخار بدبى
شركة تنظيف ستائر بالبخار بدبى
شركة تنظيف بالبخار بدبى
شركة نظافة بدبى
شركة تنظيف فى دبى
شركة تنظيف منازل فى دبى
فارس-الفرسان
ReplyDeleteشركة تنظيف بالخبر
شركة تنظيف بالخبر
شركة تنظيف فلل بالخبر
شركة تنظيف شقق بالخبر
المثالية للتنظيف بالخبر
شركة تنظيف بالقطيف
شركة تنظيف شقق بالقطيف
شركة المثالية للتنظيف بالقطيف
شركة تنظيف فلل بالقطيف
شركة مكافحة حشرات بالدمام
شركة رش مبيدات بالدمام
ReplyDeleteفرسان المدينة
شركة نقل عفش خارج المدينة المنورة
شركة نقل عفش خارج المدينة المنورة
شركة نقل عفش من المدينة المنورة إلي مكة
شركة نقل عفش من المدينة المنورة إلي جدة
شركة نقل عفش من المدينة المنورة إلي الدمام
شركة نقل عفش من المدينة المنورة إلي ينبع
شركة نقل عفش من المدينة المنورة إلي أبها
نقل أثاث من المدينة المنورة إلي القطيف
Thanks for Sharing..
ReplyDeleteERP in Chennai
ERP Software in Chennai
SAP Business One implementation Chennai
SAP Hana implementation Chennai
SAP r3 implementation Chennai
Nice Blog, Thank you so much for sharing such an amazing blog.
ReplyDeleteMutual Fund Distributor
This comment has been removed by the author.
ReplyDeleteTFC's best Pinoy TV website for all Pinoy tambayan shows of Pinoy channel free online. It's all about free Pinoy TV shows.That is really awesome for all pinoy lovers to watch all Pinoy Tambayan shows pinoy ako replay on our latest pinoy channel and pinoy tv. These all thriller and romantic dramas are the soul of TFC lambingan lovers.
ReplyDeletei am browsing this website dailly and get nice facts from here all the time .
ReplyDelete
ReplyDeleteAffordable Ac Maintenance Services Augusta, GA
It's important to take care of your air conditioning unit so it lasts longer, works better, and helps you keep energy costs down. With normal airflow obstructed, air that bypasses the filter may carry dirt directly into the evaporator coil and impair the coil's heat-absorbing capacity. A flat fee for an one-time maintenance visit costs $70 - $100 and an annual maintenance contract will cost $150. With seasonal tune-ups, you can count on your air conditioning system to operate safely, efficiently, and dependably for years.شركة تمديد مكيفات بالرياض
شركة تركيب مكيفات بالرياض
شركة صيانة مكيفات بالرياض
شركة عزل صوت بالرياض
غرف نوم جديدة للبيع بالرياض
We all make sure that your system spreads its atmosphere evenly and quietly, and operates efficiently, no matter what the season. AC & Heating Connect was established to provide timely and accurate information about air conditioning and equipment, along with objective opinions and insight. That's why, whenever we install an air conditioner, we securely save the technical details in our database.شركة تنظيف مكيفات غرب الرياض
شركة تنظيف مكيفات شرق الرياض
شركة تنظيف مكيفات جنوب الرياض
شركة تنظيف مكيفات شمال الرياض
تنظيف مكيفات بالرياض
welcome to the philppines tv network. peoples are going onward for the looking of pinoy tv shows.here you can get the latest episodes of pinoy tambayan pinoy lambingan, pinoy channel pinoy tv shows. the fantastic channel of pinoy is the . sir g thank you. for watching this and sharing this pinoy.
ReplyDeleteشركة تركيب غرف نوم بالرياض
ReplyDeleteشركة تركيب باركيه بالرياض
شركة صيانة مكيفات بالرياض
شركة تركيب اثاث ايكيا بالرياض
شركة تركيب مطابخ بالرياض
شركة صيانة غسالات بالرياض
ReplyDeleteشركة صيانة سيارات بالرياض
شركة صيانة خزانات بالرياض
شركة صيانة ثلاجات بالرياض
شركة تنظيف بالرياض
Bermain Poker online pastinya kalian akan mengincar keuntungan. Hal ini memang sudah lumrah bagi para player Poker online, dimana kalian akan mendapatkan keuntungan berkali-kali lipat dengan bergabung di
ReplyDeletehttps://www.bonanza.com/users/45754154/profile
مظلات هرمية
ReplyDeleteمظلات سيارات
مظلات حدائق
مظلات الاسواق
مظلات مسابح
مظلات حوش
مظلات شد انشائي
مظلات بي في سي
مظلات مساجد
مظلات للسطح
صور مظلات وسواتر
ReplyDeleteتركيب مظلات
مظلات سيارات
مظلات متحركة
مظلات حدائق
مظلات ساكو
مظلات بولي ايثيلين
مظلات مسابح
مظلات مدارس
مظلات حديد
supreme hoodie
ReplyDeletecurry 6
nike sb dunks
russell westbrook shoes
birkin bag
supreme outlet
kobe
jordans
kobe basketball shoes
hermes belt
examresultub.com is an extensive educational portal. Students, parents,
ReplyDeleteteachers and educational institute can get Board Exam Result,
Admission, Academic Result, Career, Study Material for Assignments,
Institutes and latest Educations News in Bangladesh.
Exam Result:
BPSC is published the bcs preliminary exam result 2021 on bpsc.gov.bd result website- https://examresulthub.com/
Bangladesh Education Board is published the hsc exam result 2021 by online online on examresulthub.com.
Download the full marksheet with number from here- https://examresulthub.com/hsc-result/
The Ministry of Education has published hsc admission result 2021 for admission in higher secondary level in Bangladesh.
Full Resources:
https://examresulthub.com/sitemap/
official website:
examresulthub.com
General Science and Technology University is published the unit a, b, c unit guccho gst admission ac bd result on the official website as well as examresulthub.com
ReplyDeleteHey there
ReplyDeleteThanks for sharing this tutorial, Really helpful, Keep on sharing more like this
Best Software Development company
Mobile app development company
Best web development company
Kabbage Vs Bluevine
ReplyDeleteIs Bluevine legit? The short answer is yes. Bluevine is a financial technology company. The Bluevine line of credit is issued by Celtic Bank, a Utah-chartered bank, member FDIC.
Bluevine quickly became an industry leader with its Bluevine Business Checking and secured business financing. But due to high demand, the company has suspended new signups for its business checking account. It's also suspended applications for financing and doesn't have an estimate for when it'll resume.
Kabbage vs bluevine business checking
Kabbage vs bluevine checking
Kabbage vs bluevine bank account
Kabbage vs bluevine vs novo
https://www.youtube.com/watch?v=8NvxjSUrSjo
Hello, I love your work and your tutorials ! Is it possible to have the supplies please ? The links are no longer available. Thank you
ReplyDeleteCaroline
شركة تركيب شبابيك المنيوم بالرياض
ReplyDeleteاصلاح كاميرات مراقبة بالرياض
فني تركيب كاميرات مراقبة بالرياض
شركة تسليك مجاري بالدمام
ReplyDeleteشركة تسليك مجاري بالخبر
شركة تنظيف مجالس بالخبر
شركة تنظيف فلل وشقق بالخبر
شركة تنظيف مجالس بالقطيف
شركة رش مبيدات بالقطيف
شركة تنظيف فلل وشقق بالقطيف
شركة رش مبيدات بالخبر
شركة تنظيف فلل وشقق بالدمام
شركة تنظيف مجالس بالدمام
شركة مكافحة حشرات بالدمام