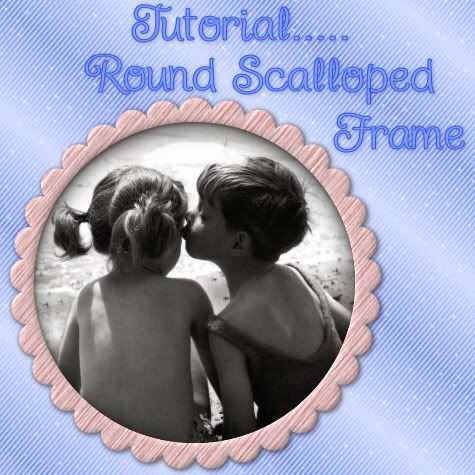
In this tutorial, I'll show you how to make a round scalloped frame with mura's meister copies. I will be doing another tut some time soon to show you how to scallop other shapes such as squares, triangles, or just about any shape you can think of.
Supplies Needed: Mura's Meister Copies plugin Download Here
1. Start by opening up a transparent image slightly bigger than the size you want your scalloped frame to be.
2. Set your Foreground and Background colour to black.
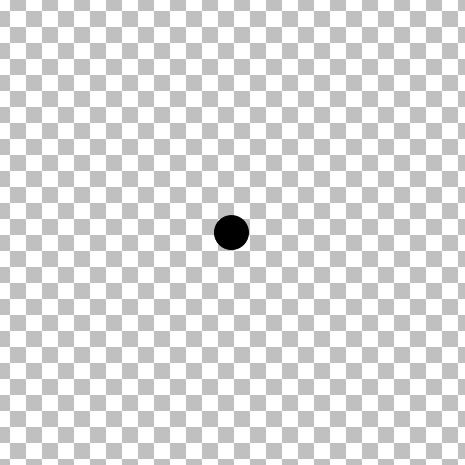
3. Click on your Preset Shapes tool on the left and set it to Ellipse. Anti-alias and Create as Vector are both checked, Line Style is Solid, and Width of 1.
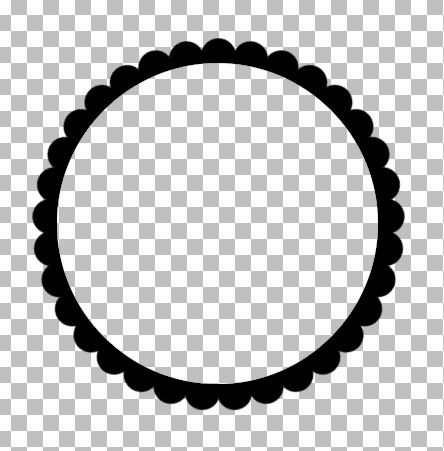
4. Hold down the Shift key and draw out a small circle, the size you want your scallops to be. (Holding down shift keeps the circle from going into an oval shape) Here's what my circle looks like.
5. In the layer palette on the right, right click on Vector 1 and choose Convert to Raster Layer.
6. Now, we need our single circle in the middle of our page for this next plugin to work, so the easiest way to do that is to go up to the Edit tab, choose Cut, then back up to the Edit tab, and choose Paste, then Paste as New Layer.
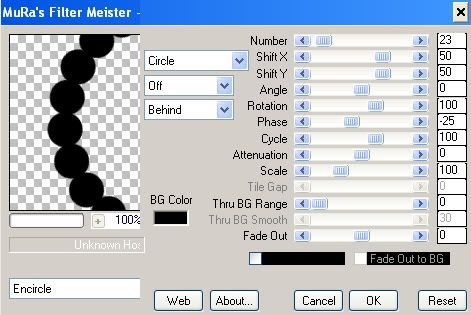
7. Next, go up to the Effects tab, down to Plugins, find Mura's Meister, and choose Copies.
8. At the bottom left, change whatever you have in there to Encircle, then make sure the rest of the settings are the same as in the picture below.
* Depending on the size of circle you made, you will have to adjust the Number section so that your dots line up with each other. My circle may not be the same size as yours, so my number will be different but the rest should remain the same.
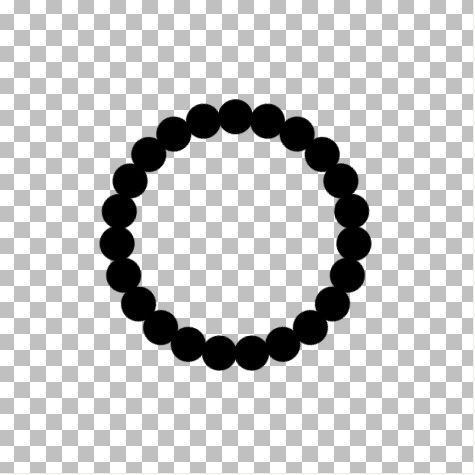
Here is what mine looks like now:
* If your result is smaller than you want it to be, go to the Edit tab and click Undo. You will revert back to your single dot. In order for your frame to increase in size, you need to increas your canvas size. Go up to the Image tab at the top, then down to Canvas Size.
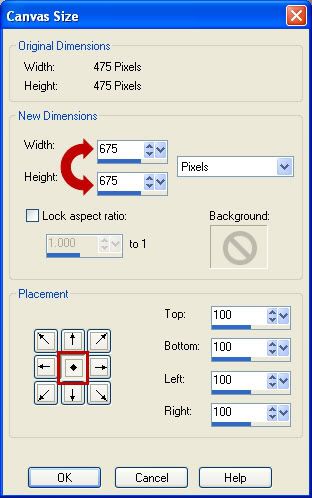
Your original height and width of your canvas is at the top. Try increasing your canvas by a few hundred pixels at a time to get the desired size. You will need to then go back and repeat steps #7 and #8 to redo the circle frame. Don't forget to change the Number section to get your dots to line up properly again.
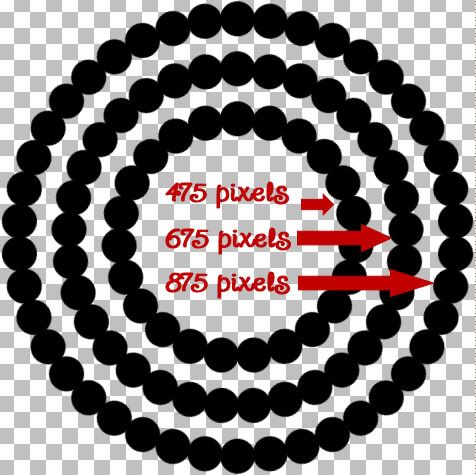
* The smallest middle section is my original canvas of 475 pixels, the second one is my result after increasing my canvas from 475 to 675, and the third I increased my canvas to 875. You decide how much you want yours to increase.
9. Now we need to fill in the middle. Click on your Magic Wand tool on the left. Mode is Replace, Match Mode is RGB, Tolerance is 30, Feather is 0, Anti-alias is checked. With your circle layer active (highlighted blue in the layer palette on the right), click once in the center.
* You will have marching ants all around the bottoms of your circles.
10. Go up to the Selections tab, choose Modify, then Expand. In the Number of Pixels section, type in 5 and hit OK.
11. Go up to the Layers tab, choose New Raster Layer.
12. Flood fill your new layer with black.
13. Go up to the Selections tab and choose Select None.
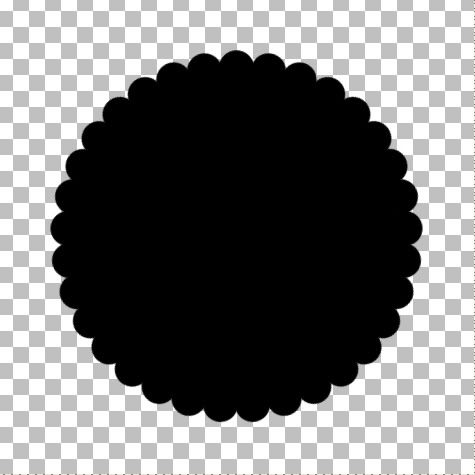
14. In the Layers Palette on the right, right click on one of the layers and from the flyout choose Merge, then Merge Visable. You should now have this:
15. Change both your Foreground and Background to white.
16. Click on your Preset Shapes tool on the left and choose Ellipse.
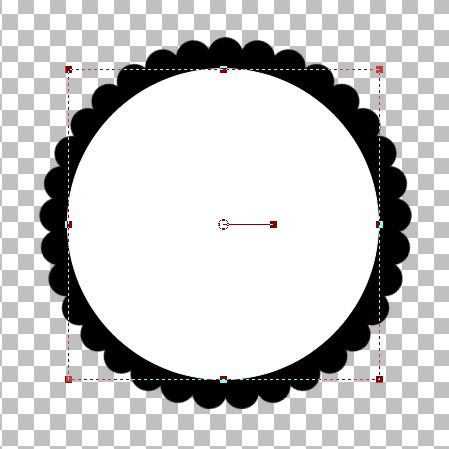
* This next step we are going to draw out a circle that will represent the hole we will cut out for the middle of your frame. Draw it out so that it is smaller than your frame and doesn't cover any of the outter scallops. It must be a perfectly round circle, but the size doesn't have to be exactly the size you want the middle of your frame to be. We will fix that too.
17. Hold down the Shift key and draw out a circle. Here's my example:
18. We need both the black circle template and the white circle to be exactly in the middle of our canvas, so click on the black circle template to activate it, go up to the Edit tab, choose Cut, back up to the Edit tab and choose Paste as New Layer. Do the same to the white circle.
* Now, It looks like I'm going to have too much of a black inner border on my scalloped frame, so I'm gonig to increase the size of my white circle just a bit to make my black border smaller.
* If you like the way yours looks now, just leave it and skip to step 21.
The white circle is a vector shape still, so we can just pull the nodes to increase the circles shape without getting any jagged edges. Click on the Object Selection tool on the left. It looks like a square with an arrow in the middle and it is probably the last tool in your toolbar.
* You will get what looks like a dotted line square with a smaller square at each corner.
19. Now, to keep this circle in perspective while we pull the node to make it bigger, you need to use your Right Click mouse button this time. Put your cursor on the bottom right square, hold down your Right Click mouse button and pull out slightly.
20. We need to center it perfectly again, so go up to the Edit tab, choose Cut, back up to the Edit tab and choose Paste as New Layer.
* You can click the Mover tool button to get rid of that dotted square so you can see how it looks without that being in the way. If you think your black border is still to big, repeat steps 19 and 20.
21. I like mine the way it is, so in the Layers Palette on the right, right click on your White Vector Circle and from the flyout choose Convert to Raster Layer.
22. All that work and now we are going to delete the white circle. Go up to the Selections tab, choose Select All, back up to the Selections tab, choose Float, up to the Selections tab again and choose Defloat.
* You should now have marching ants all around your white circle.
23. Hit the Delete button on your keyboard, and the white circle will disappear.
24. In the Layer Palette on the right, click on your black scallop layer to select it. Now hit the Delete key on your keyboard again.
* Your middle should now be transparent.
25. Go up to the Selections tab, choose Select None. Here's mine:
* Delete all layers except the black scalloped layer and save this as a .psp file so you can use it as a template again.
*Now all you need to do to colour it is, go up to the Selections tab, choose Select All, Float, then Defloat.
*Create a new layer from the Layers tab.
*Flood fill with whatever you want.... a colour, paper, gradient, pattern.......
*Delete the black template
TOU:
If you do this tutorial, your end result is yours to do whatever you wish; give it away as a freebie, use it as part of a kit, or sell it for profit. You may not make this into an action or script to give away as a freebie or to sell for a profit. A mention or a link back here would be appreciated but is not mandatory. Please do not share the supplies or tut through email or any other means. If you are using this or any of my tutorials for your groups or as part of your own tutorial, please post a link to the tut on my blog and let your members download the supplies from my blog for themselves.
Thanks for the great Tutorial and free plug-in! I will use this a BUNCH!
ReplyDeleteThank you Shawna ! I never would have thought it could be this simple ! Thank you for filling my request ! This is so awesome !!!!!
ReplyDeleteYou're welcome Deb and Debbie :)
ReplyDeleteAnother great tutorial. Thanks so much for sharing.
ReplyDeleteRobin
You write a great tutorial; easy to understand and follow. Love how you guide us through every step; so many do not. Thankyou so much. I have made my first scalloped frame. YAY. (Does a lil jig) :)
ReplyDeleteWOW! GREAT TUT! One of the best written I have ever seen! You are clear, concise and you don't add a bunch of unnecessary steps! BRAVO!
ReplyDeleteAnd THANKS!
YOU FRICKEN ROCK!!!!
ReplyDeleteYour blog keeps getting better and better! Your older articles are not as good as newer ones you have a lot more creativity and originality now keep it up!
ReplyDeleteThank you so much for the tut. It was easy to follow and I actually made one to use. Thank you also for making the plun-in so accessable.
ReplyDeleteHey I know this is off topic but I was wondering if you knew of any widgets I could add to my
ReplyDeleteblog that automatically tweet my newest twitter updates.
I've been looking for a plug-in like this for quite some time and was hoping maybe you would have some experience with something like this. Please let me know if you run into anything. I truly enjoy reading your blog and I look forward to your new updates.
My web blog :: all natural male enhancement supplement
I could not refrain from commenting. Exceptionally well written!
ReplyDeleteCheck out my page: communiteonline.com
chenlina20151203
ReplyDeletelouis vuitton outlet
michael kors outlet
michael kors handbags
oakley sunglasses cheap
air max uk
fake oakley sunglasses
cheap ray ban sunglasses
coach outlet
tory burch sale
louis vuitton
tory burch outlet
hollister co
coach factory outlet
louis vuitton outlet online
official coach factory outlet
coach factory outlet
michael kors outlet online
ugg boots outlet
coach outlet
marc jacobs handbags
adidas uk
coach outlet online
ugg boots outlet
ray ban sunglasses outlet
running shoes
louis vuitton outlet
michael kors outlet stores
canada goose outlet
canada goose outlet online
tod's shoes
nike free runs
louis vuitton outlet
coach factory outlet
coach outlet
ray ban sunglasses
kids uggs on sale
jordan 11s
cheap oakley sunglasses
air max 90
cheap air max
as
151217meiqimg
ReplyDeletelouis vuitton outlet
louis vuitton outlet
burberry outlet
mont blanc pens
uggs boots
cheap toms shoes
uggs outlet
ugg boots
ugg outlet
cheap jordans
oakley sunglasses
ray ban sunglasses
michael kors outlet online
michael kors outlet online
polo ralph lauren
ray ban wayfarer
ugg boots
louis vuitton handbags
true religion jeans
coach outlet online
ugg australia
ugg boots
michael kors handbags
oakley sunglasses wholesale
ugg outlet store
ray ban outlet
ugg boots
uggs outlet
uggs clearance
louis vuitton outlet
ugg boots for men
tiffany and co jewelry,tiffany and co outlet,tiffany and co,tiffany's,tiffanys,tiffany co,tiffany jewelry, louis vuitton outlet online,louis vuitton,louis vuitton outlet,louisvuitton.com,authentic louis vuitton,louis vuitton factory outlet,cheap louis vuitton, oakley sunglasses,oakley vault,oakley sunglasses cheap,oakleys,oakley.com,sunglasses outlet,cheap oakley,cheap oakley sunglasses,oakley outlet,cheap sunglasses,oakley prescription glasses,fake oakleys,oakley sunglasses outlet,oakley glasses,oakley store,fake oakley,oakley sale,cheap oakleys,discount oakley sunglasses, polo ralph lauren outlet online,ralph lauren,polo ralph,polo ralph lauren,ralph lauren outlet,polo shirts,ralph lauren outlet online,polo ralph lauren outlet,ralphlauren.com,polo outlet,ralph lauren polo, uggs, ugg australia,ugg slippers,uggs boots,uggs outlet,ugg boots,ugg,uggs,ugg boots clearance,uggs on sale, michael kors outlet store,michael kors outlet,michael kors outlet online,michael kors,kors outlet,michael kors handbags,michael kors outlet online sale,michael kors handbags clearance,michael kors purses,michaelkors.com,michael kors bags,michael kors shoes,michaelkors,cheap michael kors, cheap oakley sunglasses, gucci outlet,gucci handbags,gucci belts,gucci shoes,gucci,gucci belt,gucci sunglasses,gucci bags,cheap gucci, kate spade outlet,kate spade,katespade,kate spade handbags, christian louboutin shoes,louboutin shoes,louboutin outlet,louboutin,christian louboutin,red bottom shoes,red bottoms,christian louboutin outlet,red bottom shoes for women,louboutins, uggs, ray ban sunglasses, louis vuitton outlet stores,louis vuitton outlet online,louis vuitton,louis vuitton outlet,louisvuitton.com,authentic louis vuitton,louis vuitton factory outlet,cheap louis vuitton, louboutin outlet,louboutin,christian louboutin,red bottom shoes,louboutin shoes,red bottoms,christian louboutin shoes,christian louboutin outlet,red bottom shoes for women,louboutins, michael kors outlet online,michael kors,kors outlet,michael kors outlet,michael kors handbags,michael kors outlet online sale,michael kors handbags clearance,michael kors purses,michaelkors.com,michael kors bags,michael kors shoes,michaelkors,cheap michael kors, michael kors handbags,michael kors outlet,michael kors outlet online,michael kors,kors outlet,michael kors outlet online sale,michael kors handbags clearance,michael kors purses,michaelkors.com,michael kors bags,michael kors shoes,michaelkors,cheap michael kors, louis vuitton outlet,louis vuitton outlet online,louis vuitton,louisvuitton.com,authentic louis vuitton,louis vuitton factory outlet,cheap louis vuitton
ReplyDeleteair jordan,jordan pas cher,air jordan pas cher,nike air jordan,air jordan france, hermes,sac hermes,hermes pas cher,sac hermes pas cher, hogan,hogan outlet,scarpe hogan,hogan sito ufficiale,hogan interactive, coach outlet,coach factory outlet,coach outlet store,coach factory,coach outlet store online,coach factory online,coach factory outlet online,coach outlet online, michael kors, coach purses,coach handbags,coach bags, converse pas cher, nike air max, burberry pas cher, nike free,free run,nike free run,nike free pas cher,nike free run pas cher,nike free france, true religion, north face, michael kors canada, nike blazer, nike air max, hollister uk, nike free run, lululemon,lululemon canada,lululemon outlet canada,lululemon outlet online, hollister,abercrombie,abercrombie fitch,hollister france,hollister pas cher,abercrombie and fitch,hollister pas cher, mulberry,mulberry handbags,mulberry outlet,mulberry bags,mulberry uk, kate spade handbags,kate spade,kate spade outlet,katespade, louboutin,chaussure louboutin,louboutin pas cher,chaussures louboutin,chaussure louboutin pas cher,louboutin france, north face,the north face,north face pas cher,north face soldes,north face france, true religion, tn pas cher,nike tn,nike tn pas cher,nike tn requin,tn requin,tn requin pas cher, longchamp,sac longchamp,longchamps,longchamp pas cher,sac longchamp pas cher,longchamp pliage,longchamp soldes,sac longchamps,longchamp france, new balance pas cher, air force,nike air force,air force 1,air force one,nike air force 1,nike air force one,air force one nike, ralph lauren,polo ralph lauren,ralph lauren pas cher,polo ralph lauren pas cher,ralph lauren france, replica handbags,coach factory outlet,coach factory,coach factory outlet online,coach factory online, oakley pas cher,oakley,oakley soldes,lunette oakley pas cher,oakley france
ReplyDeleteninest123 16.02
ReplyDeletemichael kors, tiffany and co, replica watches, ugg boots, louboutin, oakley sunglasses, nike outlet, michael kors outlet, gucci outlet, louis vuitton, ray ban sunglasses, jordan shoes, tiffany jewelry, oakley sunglasses, prada handbags, oakley sunglasses, longchamp, replica watches, chanel handbags, christian louboutin outlet, ray ban sunglasses, polo ralph lauren outlet, michael kors outlet, nike free, louis vuitton outlet, louis vuitton outlet, louis vuitton, burberry, polo ralph lauren outlet, longchamp outlet, ugg boots, michael kors outlet, cheap oakley sunglasses, tory burch outlet, nike air max, burberry outlet online, oakley sunglasses, nike air max, louboutin shoes, longchamp outlet, ugg boots, michael kors outlet, prada outlet, michael kors outlet, uggs on sale, louis vuitton, ray ban sunglasses, louboutin outlet, ugg boots
lululemon, oakley pas cher, hogan, tn pas cher, new balance pas cher, north face, lacoste pas cher, ray ban uk, michael kors, true religion jeans, hollister pas cher, nike air max, timberland, mulberry, hollister, ray ban pas cher, nike huarache, coach outlet, nike roshe, abercrombie and fitch, converse pas cher, michael kors, air jordan pas cher, true religion jeans, vanessa bruno, nike free run uk, longchamp, longchamp pas cher, michael kors, nike air max, nike air max, nike blazer, nike roshe run, ralph lauren uk, hermes, north face, nike free, burberry, michael kors, sac guess, nike trainers, air max, air force, louboutin pas cher, coach purses, true religion outlet, replica handbags, sac longchamp, true religion jeans, vans pas cher, ralph lauren pas cher
ReplyDeletecanada goose uk, moncler outlet, moncler, canada goose outlet, louis vuitton, louis vuitton, wedding dresses, sac louis vuitton pas cher, links of london, barbour jackets, montre pas cher, lancel, supra shoes, canada goose outlet, canada goose, louis vuitton, pandora jewelry, replica watches, converse outlet, moncler, ugg boots uk, swarovski crystal, bottes ugg, toms shoes, louis vuitton, thomas sabo, pandora charms, canada goose, moncler, juicy couture outlet, ugg,ugg australia,ugg italia, canada goose, ugg pas cher, swarovski, pandora jewelry, doke gabbana outlet, doudoune canada goose, moncler, moncler, ugg,uggs,uggs canada, barbour, marc jacobs, moncler, hollister, canada goose, juicy couture outlet, pandora charms, karen millen, moncler, coach outlet
ReplyDeleteninest123 16.02
شركة مكافحة الصراصير بالرياض
ReplyDeleteيسبب انتشار للحشرات الكثير من الأمراض المستعصية التي لا يمكن علاجها بشكل سهل وخاصة أن الحشرات تنتشر بشكل كبير في الأماكن الغير نظيفة لذلك تنصح شركة مكافحة حشرات بالرياض بتنظيف المكان الذي تعيش فيه بشكل مستمر سواء من خلالك أو من خلال شركات خدمات مختلفة كما تقدم شركة مكافحة حشرات بالرياض مجموعة مميزة من المبيدات الحشرية القادرة علي التغلب على كافة أنواع حشرات
yeezy 350
ReplyDeletekyrie 5 shoes
supreme new york
cheap jordans
chrome hearts outlet
yeezy shoes
off white
yeezy 350
hermes birkin
kyrie irving shoes
nike off white
ReplyDeleteyeezy 500
palm angels t shirt
golden goose
hermes bags
bapesta
kevin durant shoes
hermes outlet online
cheap jordans
supreme clothing