
Supplies: Download Here
Needed: Simple filter 4 way average. Get it Here Click on the photo icon to download it. Unzip it and copy and place it into the plugins folder wherever you have yours saved on your computer.
1. Open up a new transparent image about 400 pixels wide by 450 pixels long.
* This will be the size of your picture you are going to insert later on. You can make this any size you want when redoing this tutorial, but for now, keep to the same size I'm using.
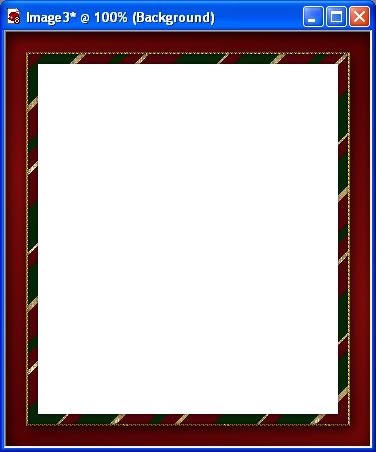
2. Open up from the supplies folder one of the swatches. I'm going to be using SK Christmas Frame 02. Set it as your foreground pattern, Angle 0, and Scale 100.
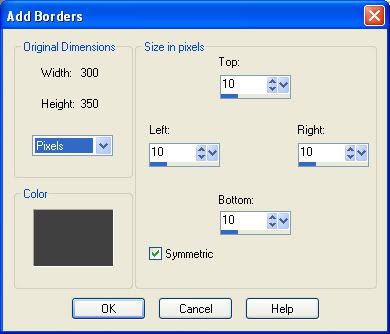
3. Go up to the Image tab and choose Add Borders.
* You might get a popup message saying something like the image must be flattened into a single background layer. Click OK.
4. Change your settings to the same as the picture below. If you colour swatch is white, change that to a darker shade of grey instead. Since our canvas has now been flattened, it has a white middle, so if you add a white border as well, we aren't going to be able to select it with the magic wand later on, so change your colour to some shade of grey.
5. Click on your Magic Wand tool on the left, Mode is replace, Match Mode is RGB Value, Tolerance is 30, Feather is 0, and Anti-alias is checked. Click once on your grey border. You should have marching ants all around your border.
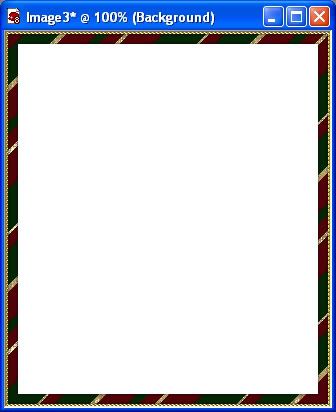
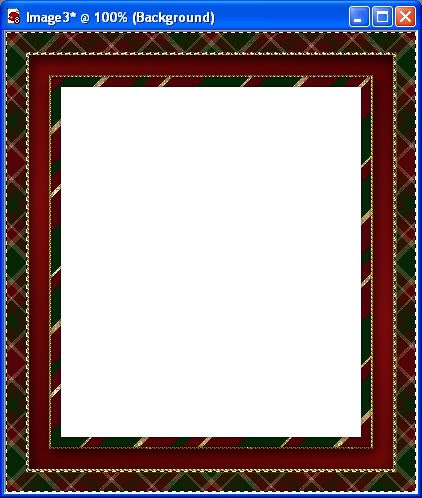
6. Click on your Flood Fill tool on the left and then click once on your grey border to fill it with the stripes from your foreground pattern. You should now have this:

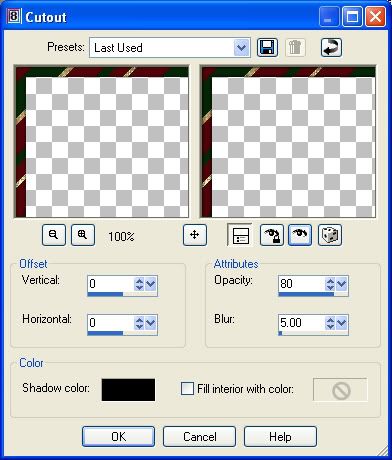
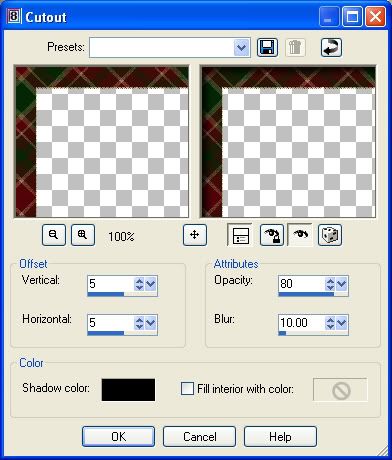
7. Now, go up to the Effects tab, over to 3D Effects, and then to Cutout and use these settings:
8. Go up to the Selections tab and choose Deselect.
* Now to add some small coloured beads.
11. Go up to the Image tab and choose Add Borders. Change you pixles to 2 and your colour to white. Since we have a dark frame, we need a light colour for the border so that it doesn't blend into the frame's colours and we can select it easily with the magic wand.
* You should now have a 2 pixel white border around your canvas.
12. From the supplies folder, choose one of the coloured bead patterns and set it as your background. I'm going to use the gold pattern.
13. Click on your Magic Wand tool on the left and click once on your outter white border to get the marching ants. If you find it hard to see, you can zoom in to make your canvas appear bigger for better viewing.
14. Click on your Flood Fill tool on the left and then click once inside the marching ants to fill it with your bead pattern.
15. Go up to the Selections tab and choose Select None. This is what you should have so far:
16. Next, set your foreground colour to #570101 and your background colour to #8B0B0B.
17. Click on your background swatch again and click the gradient tab. From the gradient dropdown list, find foreground-background and select that. Set it to Linear, Angle at 20 and Repeats at 1.
18. Go up to the Image tab and choose Add Border again. Leave the colour as white but change your pixels to about 20.
19. Click on your Magic Wand tool and then click once on the new 20 pixel white border to select it.
20. Click on your Flood Fill tool on the left and with your RIGHT mouse button, click once inside the marching ants to fill it with your background gradient.
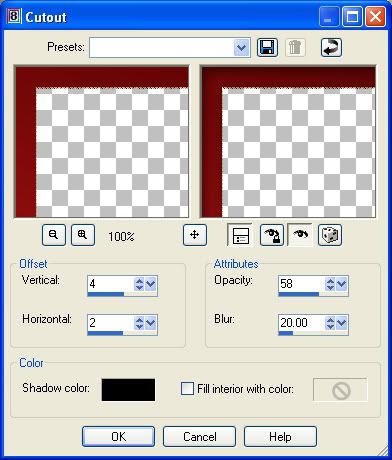
19. Go up to the Effects tab, over to 3D Effects, then to Cutout and use these settings:
20. Repeat step #19 again, but this time change the Opacity to 40.
21. Go to the Selections tab and choose Select None. This is what you should have:
22. Go up to the Image tab and click on Add Border. Change the pixels to 3.
23. Click on your Magic Wand tool on the left and then click once on the white border.
24. Set your foreground to one of the bead patterns, I'm still using the gold.
25. Click on your Flood Fill tool and then click once inside the marching ants to fill it with your beads.
26. Go up to the Selections tab and choose Select None.
27. Click on the Image tab and choose Add Border. Change the pixels to 20.
28. Click on your Magic Wand tool and click once on your white border.
29. Set your foreground pattern to SK Christmas Frame 02, Angle is 0 and Scale is 100.
30. Click on your Flood Fill tool and then click once inside the marching ants to fill it with the diagonal pattern.
31. Go up to the Effects tab, down to Plugins, then find Simple and from the flyout choose 4 way average.
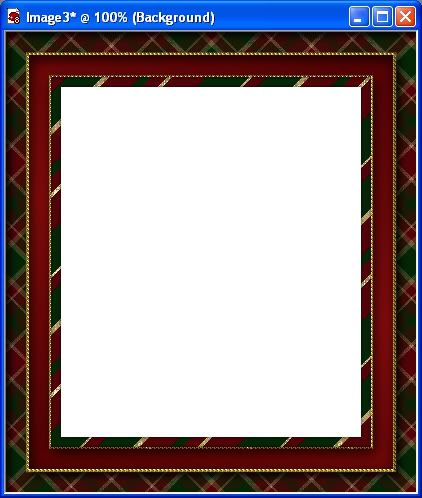
* Your diagonal stripes should have turned into a plaid pattern. See picture below:
32. Go up to the Effects tab, over to 3D Effects and choose Cutout and use the settings below:
33. Go up to the Selections tab and choose Select None. Here's mine so far:
34. Go up to the Image tab and choose Add Border. Change the number of Pixels to 3.
35. Click on your Magic Wand tool, then click once on your white border.
36. Set your coloured beads as your foreground pattern.
37. Click on your Flood Fill tool on the left and then click once inside the marching ants to fill it with your beads. Here's what mine looks like so far:

* We're almost done. Now to get rid of the white middle.
38. In the layer palette, right click on Background and choose Promote Background Layer.
39. Now click on your Magic Wand tool, click once on the white part in the middle of your frame. Marching ants should be all around the white middle square.
40. Go up to the Edit tab and then down to Clear and click on it. Your white should have disappeared leaving you with a transparent middle.
41. Go up to the Selections tab and choose Select None. And we are done :) Save it as a .png file or .psp file to preserve the transparency in the middle.
TOU:
If you do this tutorial, your end result is yours to do whatever you wish; give it away as a freebie, use it as part of a kit, or sell it for profit. You may not make this into an action or script to give away as a freebie or to sell for a profit. A mention or a link back here would be appreciated but is not mandatory. Please do not share the supplies or tut through email or any other means. If you are using this or any of my tutorials for your groups or as part of your own tutorial, please post a link to the tut on my blog and let your members download the supplies from my blog for themselves.
going to have a go. I'm been doing pretty good with your tuts. thanks I been learning a lot. each time I do one of your tuts I learn a little more about PSP.I'm not a great lover of plugins but simple is one I already have and use.
ReplyDeleteDidomum
Thanks so much for sharing
ReplyDeleteThank you very much for these awesome tutorials and for you taking the time to do these.
ReplyDeleteGreat tutorial, for a beautiful frame. Thank you.
ReplyDeleteBlessings!
Bambi
Your tutorials are so easy to follow and the end result is so beautiful. Thank you so much for sharing them :)
ReplyDeleteGracias, me gusta aprender y con tus tutoriales, es facil, besos.
ReplyDeleteThank you for sharing to us.there are many person searching about that now they will find enough resources by your post.I would like to join your blog anyway so please continue sharing with us.
ReplyDeletethe font is great, i think i shoul them for my website about font at coolfonts.org
ReplyDeletethanks four your information
ReplyDeletePerguruan Tinggi Akademi Telkom Jakarta memiliki program D3 Teknik Telekomunikasi dari Kampus Telkom Pertama di Ibukota Indonesia dan satu-satunya di DKI Jakarta (mencakup juga wilayah Tangerang, Depok, Bekasi dan Bogor) yang memiliki Akreditasi B menerima mahasiswa baru.
Hubungi: Jl. Daan Mogot KM.11, Jakarta Barat 11710 Telepon 021 5451697 / 70330000
| Info PMB Kaskus | Info PMB Kompas| Info PMB Detik
Akademi Telkom Jakarta Blogspot
Akademi Telkom Jakarta Wordpress
Jangan lupa memesan Tiket Kereta Super Murah dan sebelum berangkat baca Gapeka 2015
20150728 junda
ReplyDeletecoach outlet
ed hardy clothing uk
coach outlet online
ralph lauren uk outlet
gucci sito ufficiale
true religion
kate spade bags
michael kors handbags
christian louboutin shoes
fitflops sale
coach outlet store online
coach outlet store online
air max uk
louis vuitton sacs
kate spade outlet
coach factory outlet
louboutin pas cher
michael kors
pandora charms
nike air force 1
kate spade handbags
ray ban wayfarer
true religion jeans outlet
ed hardy clothing outlet
chanel online shop
ray ban sunglasses
hollister outlet
michael kors outlet
michael kors purse
mcm backpack
gucci handbags
michael kors handbags
louboutin
burberry scarf
oakley sunglasses outlet
tn pas cher
michael kors outlet
pandora charms
ray bans
air jordan uk
151212meiqing
ReplyDeletechanel bags
air max 90
ugg boots
michaek kors outlet
pandora jewelry
the north face
canada goose outlet
ray ban sunglasses
pandora jewelry
nike roshe run
cheap uggs
ugg slippers
ugg boots
tods shoes
ugg outlet
michael kors outlet
canada goose outlet
hollister uk
cheap toms shoes
true religion
michael kors outlet online
cheap oakley sunglasses
gucci shoes
polo ralph lauren
adidas originals
adidas superstar
uggs boots
michaek kors handbags
coach outlet online
canada goose
abercrombie and fitch
fake oakleys
louis vuitton purses
louis vuitton outlet
uggs clearance sale outlet
louis vuitton bags
louis vuitton outlet
michael kors outlet online
coach factory outlet
ugg outlet
151217meiqimg
ReplyDeletelouis vuitton outlet
louis vuitton outlet
burberry outlet
mont blanc pens
uggs boots
cheap toms shoes
uggs outlet
ugg boots
ugg outlet
cheap jordans
oakley sunglasses
ray ban sunglasses
michael kors outlet online
michael kors outlet online
polo ralph lauren
ray ban wayfarer
ugg boots
louis vuitton handbags
true religion jeans
coach outlet online
ugg australia
ugg boots
michael kors handbags
oakley sunglasses wholesale
ugg outlet store
ray ban outlet
ugg boots
uggs outlet
uggs clearance
louis vuitton outlet
ugg boots for men
ReplyDeletewah article was very nice and interesting, I feel happy when I read. In the next post ya wait ... regards
nice post..
ReplyDeletethanks for information
This comment has been removed by the author.
ReplyDeleteMẫu quà tặng doanh nghiệp giá rẻ
ReplyDeleteشركة تنظيف بالطائف
ReplyDeleteشركة تنظيف مجالس بالطائف
شركة تنظيف بنجران
شركة تنظيف واجهات بجازان
شركة تسليك مجارى بحائل
شركة شفط بيارات بحائل
كشف تسريبات المياه وعزل خزانات
شركة عزل خزانات بالطائف
شركة عزل خزانات بجازان
شركة عزل خزانات بحائل
Bài viết rất hay, bạn có thể xem qua 1 số tin tức liên quan:
ReplyDeletedecal dán kính
decal dán tường
cửa hàng giấy dán tường
Bài viết rất hay, tham khảo thông tin liên quan dưới đây:
ReplyDeleteghế massage nào tốt
ghế massage loại nào tốt
ghế massage toàn thân loại nào tốt
bài viết rất hay, rất hữu ích cảm ơn bạn đã chia sẻ
ReplyDeletemọi người tham khảo thêm các mẫu ghế massage mới nhất ở đây nhé
ghế massage giá rẻ
giá ghế matxa toàn thân
giá ghế mát xa toàn thân
Guys looking for instant fun can seek out some sizzling Indore escorts. At miss Delhi Escort, the high performing independent Surat Escorts agency, we try to offer liberal call girl who can serve you their hot services.
ReplyDeleteExperience Hot South Ex Escorts to explore all your desires
ReplyDeleteFind the hottest South Ex Escorts on your phone then you have come to the best Escorts Girl Provider company All of the naughtiest Escorts in South Ex has to offer in one place. Whether you are looking for a private, independent or brothel agency Call girls in South Ex
South Ex Escorts
Call girls in South Ex
Nice article and very useful thanks for share with us.
ReplyDeleteWelcome to Our Escort Services
Jodhpur Escorts
Jodhpur Escorts
3d Product Design | 3d Product Design Company | Quickgunz Pvt Ltd
ReplyDeleteQuickgunz Pvt Ltd is a leading 3D product Design Company where we design 3d Product design for any kind of High-Quality products like furniture, shoes, medical, home appliances, automobile, Electronics, a heavy machine so on a model design by us.
3d Product Design
3d Product Design Company
Informative tutorial. Thanks for tutorial.
ReplyDeleteBackground Removal Service
Promote Abhi is the top-rated SEO services company in Hyderabad or SEO consultant Hyderabad. As a top digital marketing agency, We offer the best SEO services in Hyderabad
ReplyDeleteNow, you can buy indoor plants online near dwarka, new delhi with Ferns N Petals. Choose from our wide range of indoor plants on our website and send them across on various!
Fix SilverSingles Login Problem ... decreases the genuineness of a user profile so it's terribly necessary to spot and solve the issue.
For example, an Interior Designers and Decorators in Gorakhpur, Uttar Pradesh: may recommend changing the layout of the furniture. In other words, decorators are hands-off in the design process!
chasecard asks you to verifycard delivery whenever you get a new credit card in the mail. This is the same thing as activating a Chase credit card.
"I am very interested in the information contained in this post. The information contained in this post inspired me to generate research ideas. Uhamka
ReplyDeleteUnimuda Sorong"
The content shared is very useful, please refer to my content:
ReplyDeletecách chữa đau vai gáy của người nhật ,
massage tay có tác dụng gì ,
Bà bầu có được ngồi ghế massage không?