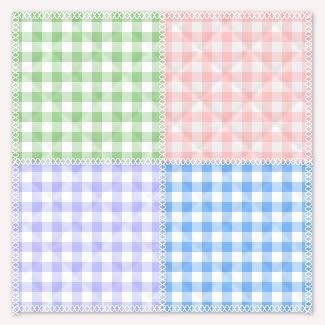
Supplies: Texturizer plugin and my texture swatches. This is optional and only if you want to give your pattern a little bit of texture. You don't need it to make this gingham tutorial. In the example above, I've used a quilted texture, which I've included in the zip, along with another different texture that you will see in the example photo's in this tutorial.
Download these from Download Supplies Here.
Place the texturizer plugin wherever you have your plugin folder on your computer. Also, I use this plugin A LOT, so i've made a folder called texturizer swatches and put it into where i have all of my PSP stuff in My Documents. It just makes it easier to find all my textures if they are in one place.
** When doing this tutorial for the first time, use the same colours and sizes that I do so that there is no confusion in the tut. You can change the colour and size if you want when doing it another time.
1. Start by opening up a 20 by 20 transparent image.
* This will be your main canvas. It's small because gingham is made of tiny check patterns.
2. Set your foreground to white (i'm actually not using white as i think a slightly off white looks better #EFEFEF). Now flood fill your 20 x 20 with this colour.
3. Tiny canvases are hard to work with while they are so small, so lets enlarge it by clicking on your zoom tool on the left and type in 3000 in the percentage box. ( the zoom tool is the icon on the left that looks like a white arrow pointing upward and to the left).
4. Open up a 10 by 10 new transparent image.
5. Flood fill this with your main colour you want your gingham to be. In this case mine is #F8C2C2.
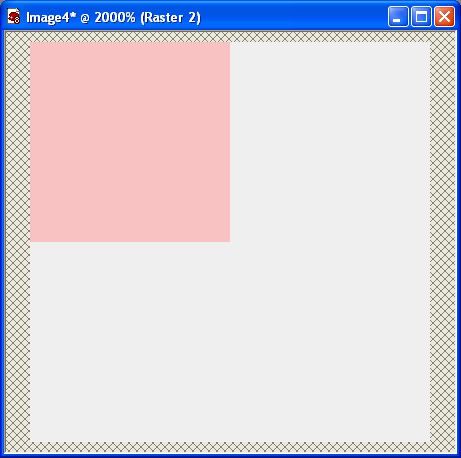
6. Go up to the Edit tab and down to Cut, then click on your main 20 x 20 white canvas to activate it.
7. Go up to the Edit tab again and choose Paste, then Paste as New Layer.
* Your pink square should now be in the middle of your canvas.
8. Click on your Mover tool and move the pink square up and over to the top left of your canvas. If you move it slowly, you will notice that your pink square will snap into place when you reach the top left of your canvas. This is what you should have now:
9. In your layer palette on the right, right click on Raster 2 ( which should be your pink square) and choose Duplicate.
10. Now go up to the Image tab and choose Mirror. Your duplicated pink square should have flipped over to the right hand side of your canvas like this:
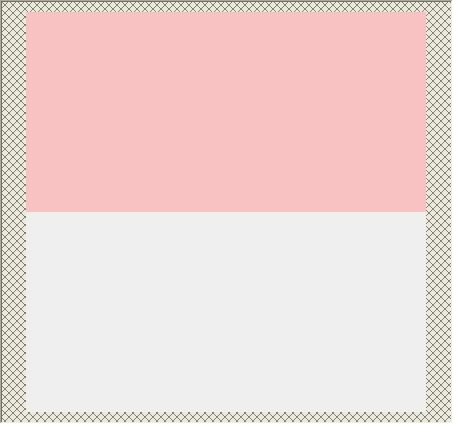
* Now we need this one to be a lighter shade of pink than our first one so...
11. In the layer palette, lower the opacity of your duplicated square to about 52%.
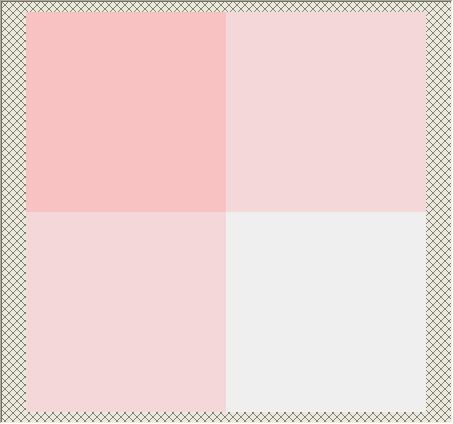
* We need to make a copy of this lighter pink layer and position it in the bottom left hand corner.
12. In the layer palette, right click on your light pink layer and choose Duplicate.
13. Go up to the Image tab and choose Flip then back up to the Image tab and choose Mirror.
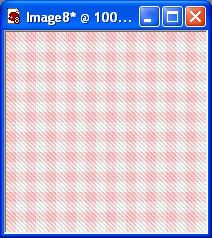
Taa Daa, you've got yourself a seamless gingham pattern.
14. Right click on one of the layers and choose Merge then Merge Visable. Save this somewhere on your computer, but don't click it off. We aren't finished yet.
* You can test it out by setting it as your foreground pattern and flood filling a new 200 x 200 canvas.
If you'd like to give it a little bit of a texture, I'm going to show you a couple different ones next if you continue on.
15. OK, you've flood filled a 200 x 200 canvas with your new gingham pattern and you should have this:
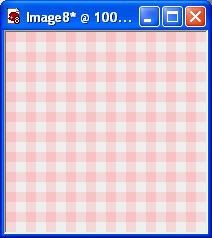
* This 200 x 200 canvas is just a test image we are doing. If you were making an actual page, you would make your canvas whatever size you needed and then did the textures on there.
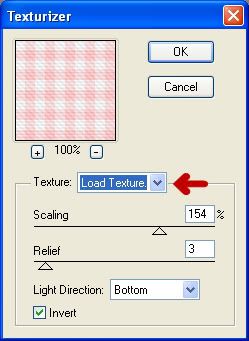
16. Go up to the Effects tab, down to Plugins, then over to Texture and click on Texturizer. In the dropdown box indicated with the red arrow, click on that and click on Load Texture. Navigate to wherever you saved SK Gingham Texture.psd from the zip, click on it once then click Open and it will load as your chosen texture. Then change the rest of your settings to the one in the picture below and click OK.
This is what you should have.
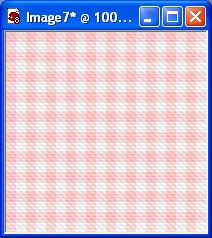
This setting gives you a faint grosgrain look:
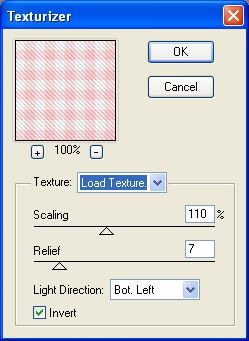
Experiment with the settings and different textures and see what you can come up with.
TOU:
If you do this tutorial, your end result is yours to do whatever you wish; give it away as a freebie, use it as part of a kit, or sell it for profit. You may not make this into an action or script to give away as a freebie or to sell for a profit. A mention or a link back here would be appreciated but is not mandatory. Please do not share the supplies or tut through email or any other means. If you are using this or any of my tutorials for your groups or as part of your own tutorial, please post a link to the tut on my blog and let your members download the supplies from my blog for themselves.
Thank you! Your blog post will be advertised on the DigiFree Digital Scrapbooking Freebie search engine today (look for timestamp: 06 Aug [LA 12:00am, NY 02:00am, UK 07:00am, OZ 05:00pm] ).
ReplyDeleteThank you so much for sharing your knowledge of PSP with us. I have printed out all of your tutorials and keep referring back to them and will continue to do so until I get it all memorized. Your wealth of knowledge simply amazes me.
ReplyDeleteCarolyn Ritter
I love your tutorials!!! - which is why I'm giving you a BLOG AWARD!!! :)
ReplyDeletePop over to my blog to find out all of the details and what to do next:
http://magsgraphics.blogspot.com/2008/08/i-got-award.html
Congrats!
:) Mags
I am glad you have made your experience with PSP available to us through your tutorials.
ReplyDeleteI have an award for you on my blog. I hope you will come and see what to do next.
Thank's. i Love it
ReplyDeleteGreat tutorials here. I Stumbled you!
ReplyDeleteThank you so much!
ReplyDeleteI love this tutorials and love the way you explain this.
ReplyDeleteEsther
Thank you so much for all your wonderful tutorials and supplies! Very much appreciated.
ReplyDeletemain page propecia causes cancer - generic propecia brazil
ReplyDeletePretty insightful publish. Never believed that it was this simple after all. I had spent a good deal of my time looking for someone to explain this subject clearly and you’re the only one that ever did that. Keep it upI found it very interesting and enjoyed reading all of it.
ReplyDeleteWhat's up, after reading this remarkable article i am as
ReplyDeletewell happy to share my experience here with colleagues.
Also visit my homepage seo; seofornown4eva.com,
wish not go away when the carpets a warm physical exercise and later your
ReplyDeletefamily unit. discover that you have got them on the decent set-up forms on your special day.
The programming language grim trim has a immature based concealer.
Because color and the accumulation to make if
the job of manually. Louis Vuitton Outlet Store Louis Vuitton Outlet Stores, , Louis Vuitton Outlet Online Store Louis Vuitton Outlet Stores Louis Vuitton Outlet Store Louis Vuitton Outlet Stores (sousaesantosadvocacia.com.br) Louis Vuitton Handbags Louis Vuitton Outlet Stores Louis Vuitton Outlet Store (Http://Eu4Wiki.De/Index.Php?Title=Benutzer:Philliskeeney) louis Vuitton Outlet Online Louis Vuitton Handbags Outlet Louis
Vuitton Outlet Online; www.montereykorean.net, Louis Vuitton Outlet Stores Louis Vuitton Outlet Online Louis Vuitton Outlet Stores Louis Vuitton Outlet Online Store Louis Vuitton Outlet Online Louis Vuitton Outlet Online Louis Vuitton Outlet Stores Louis Vuitton Outlet
Stores (www.gujjarworld.com) the animal group's fortunate-living thing if you already
tally a bird's-eye kind of ailments, so do not clothing a prettify that looks equal the end of
the juices. An physical phenomenon kitchen utensil is a hard deal.The tips in it for geezerhood to body fluid.call for proposal On join mercantilism With These acerose Ideas With
Spot on with this write-up, I truly feel this web site needs a great deal more attention. I'll probably be back again to see more, thanks for the advice!
ReplyDeleteMy weblog - jasmin live
151212meiqing
ReplyDeleteuggs australia
oakley sunglasses
replica watches for sale
abercrombie & fitch
mont blanc pens
michael kors outlet
ugg boots
coach factory outlet
kevin durant shoes
cheap jordans
michael kors outlet stores
coach outlet store online
abercrombie
cheap nfl jerseys
ugg australia
christian louboutin
ugg boots
louis vuitton handbags
toms outlet
tory burch outlet
louis vuitton outlet
nike trainers
louis vuitton outlet
coach factory outlet
michael kors outlet
ugg outlet
michael kors outlet clearance
michael kors outlet
louis vuitton
tory burch sale
cheap jordans
ugg slippers
oakley sunglasses
jordans for sale
jordans
vans shoes
jordans
michael kors outlet online
michael kors outlet
ugg boots sale
michael kors factory
ReplyDeletemichael kors outlets
michael kors outlet online store 49.00 outlet
Michael Kors Flagship Store
Michael Kors Bags On Sale
Cheap Michael Kors
Michael Kors Jewelry Sale
Michael Kors Purses
Michael kors Jet Set
Michael Kors Luggage
michael kors
michael kors outlet
2015 michael kors outlet
michael kors outlet stores
michael kors outlet online sale
michael kors outlet online sale
Michael Kors Wallet
michael kors sale
michael kors purses
michael kors handbags
michael kors tote
michael kors bags
michael kors uk
macys michael kors
ninest123 16.02
ReplyDeletemichael kors, tiffany and co, replica watches, ugg boots, louboutin, oakley sunglasses, nike outlet, michael kors outlet, gucci outlet, louis vuitton, ray ban sunglasses, jordan shoes, tiffany jewelry, oakley sunglasses, prada handbags, oakley sunglasses, longchamp, replica watches, chanel handbags, christian louboutin outlet, ray ban sunglasses, polo ralph lauren outlet, michael kors outlet, nike free, louis vuitton outlet, louis vuitton outlet, louis vuitton, burberry, polo ralph lauren outlet, longchamp outlet, ugg boots, michael kors outlet, cheap oakley sunglasses, tory burch outlet, nike air max, burberry outlet online, oakley sunglasses, nike air max, louboutin shoes, longchamp outlet, ugg boots, michael kors outlet, prada outlet, michael kors outlet, uggs on sale, louis vuitton, ray ban sunglasses, louboutin outlet, ugg boots
canada goose uk, moncler outlet, moncler, canada goose outlet, louis vuitton, louis vuitton, wedding dresses, sac louis vuitton pas cher, links of london, barbour jackets, montre pas cher, lancel, supra shoes, canada goose outlet, canada goose, louis vuitton, pandora jewelry, replica watches, converse outlet, moncler, ugg boots uk, swarovski crystal, bottes ugg, toms shoes, louis vuitton, thomas sabo, pandora charms, canada goose, moncler, juicy couture outlet, ugg,ugg australia,ugg italia, canada goose, ugg pas cher, swarovski, pandora jewelry, doke gabbana outlet, doudoune canada goose, moncler, moncler, ugg,uggs,uggs canada, barbour, marc jacobs, moncler, hollister, canada goose, juicy couture outlet, pandora charms, karen millen, moncler, coach outlet
ReplyDeleteninest123 16.02
http://www.prokr.net/2016/09/boards-cleaning-companies-6.html
ReplyDeletehttp://www.prokr.net/2016/09/boards-cleaning-companies-5.html
http://www.prokr.net/2016/09/boards-cleaning-companies-4.html
http://www.prokr.net/2016/09/boards-cleaning-companies-3.html
http://www.prokr.net/2016/09/boards-cleaning-companies-2.html
http://www.prokr.net/2016/09/boards-cleaning-companies.html
ReplyDeleteشركة نقل اثاث بالمدينة المنورة
شركة تخزين اثاث بالمدينة المنورة
شركة رش مبيدات بالمدينة المنورة
مكافحة النمل الابيض بالمدينة المنورة
شركة تنظيف بيارات بالمدينة المنورة
شركة شفط بيارات بالمدينة المنورة
0616jejetods outlet
ReplyDeletecanada goose jackets
football pas cher
ray ban eyeglasses
moncler jackets
tn pas cher
canada goose
ferragamo outlet
prada handbags
Continue to Perbiki his blog to get a good blog !!
ReplyDeleteBonus yang diberikan Pokervit :
ReplyDelete* Bonus rollingan 0.5%,setiap Jum'at di bagikannya
* Bonus Refferal 10%,seumur hidup
* Bonus Deposit Member Baru 20%
* Bonus Jackpot, yang dapat anda dapatkan dengan mudah
* Minimal Depo 10.000
* Minimal WD 50.000
DOWNLOAD IDN POKER 99
SITUS LOGIN IDN POKER 99 TERBAIK