
Needed: EyeCandy 5 Impact
Supplies zip you can get HERE. You need to put the 2 Eye Candy 5 glass presets into the Alien Skin EC 5 Impact folder/Settings/Glass
1. Open up a 400 x 400 transparent canvas.
2. Put your foreground colour to #059EE4 and your background colour to #A1E1FF and click OK.
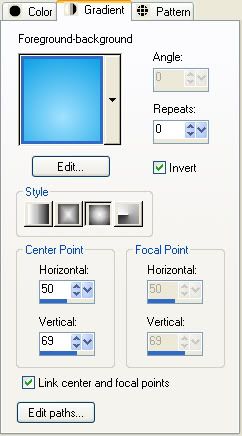
3. Click on your background colour again and then click on the Gradient tab at the top. Change your settings to the ones in the picture below:
 :
:4. Click on your Preset Shapes tool on the left and scroll down till you find the Ellipse. In the options bar at the top:
Anti-alias is checked
Create as Vector is checked
Line Style is Solid
Width is 1
5. Hold down your Shift key and draw out a fair size circle on your canvas.
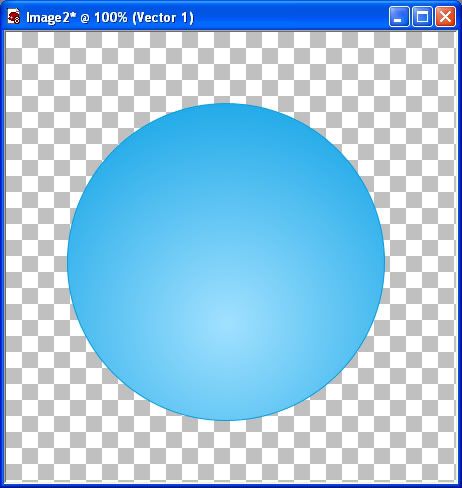
6. In the Layer Palette on the right, right click on Vector 1 and from the flyout choose Convert to Raste Layer.
* Decide what you want to put in the middle of your button. It can be text, tube, photo, or whatever you want. In the supplies folder, I've given you a sample flower bunch to use for this tut.
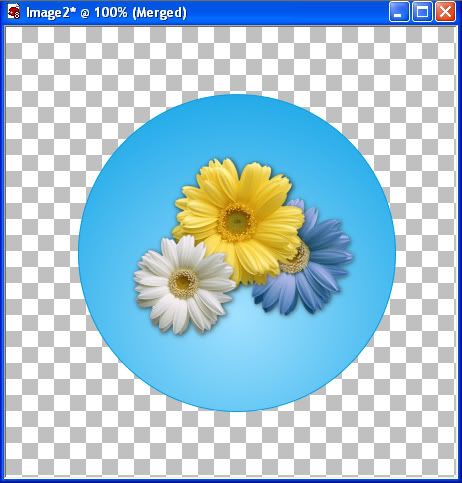
7. Copy and paste your image into the middle of your circle.
8. Now give your text, or tube image a slight drop shadow. Use the settings like in the picture below.

9. In the Layers Palette, right click on one of the layers and choose Merge, then Merge Visable.
Here's what mine looks like now:
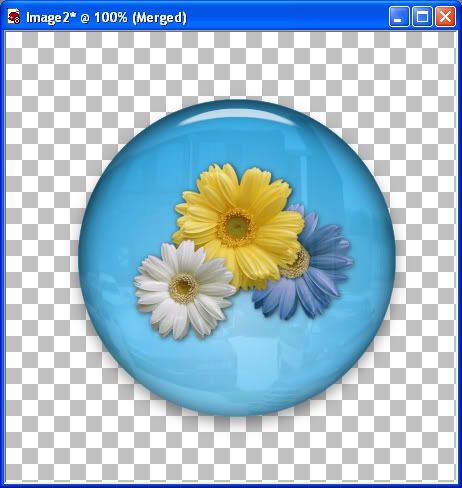
10. Go up to the Effects tab, then down to Plugins, then from the list find Alien Skin Eye Candy 5 Impact, then click on the Glass Option.
11. On the left you will see User Settings. Choose on of the glass presets from the list. I'm going to be using Simple Glass Button 02. Select it then click OK.
Here's mine:
* You can add any extra highlights on it, or when in the EC Glass options, fool around with the different reflections and settings in there to get different looks.
TOU:
If you do this tutorial, your end result is yours to do whatever you wish; give it away as a freebie, use it as part of a kit, or sell it for profit. You may not make this into an action or script to give away as a freebie or to sell for a profit. A mention or a link back here would be appreciated but is not mandatory. Please do not share the supplies or tut through email or any other means. If you are using this or any of my tutorials for your groups or as part of your own tutorial, please post a link to the tut on my blog and let your members download the supplies from my blog for themselves.
Nice tutorial. Could this be accomplished in PSE also?
ReplyDeleteYes it can kw. The only thing different would be the gradient to draw the circle. Just use a dark and a light shade of the same colour for your fg and bg colours. Use a radial gradient and select the first preset in the gradient palette and draw out your circle. I don't have pse, but that way works in ps, so it should work in pse too.
ReplyDeleteOh, you said PSE and I read it as PS. I'm not sure about Elements, as I've never used it, sorry.
ReplyDeleteShawna
Thanks, Shawna. I'm going to give it a try and see what I come up with. I'm new to PSE but I'll give it a try. I've been using PaintNet for sometime now so I'm ready for a new challenge. :-)
ReplyDeleteShawna, thank you so much for the presets as well. I couldn't get my Glass looking just "right". The presets are FABULOUS! More presets! More presets!
ReplyDeleteFun and easy tut, thanks
ReplyDeleteI love your tutorials.. I managed to do it again :) Can it be true.. LOL I can actually make these things on my own?? Hee hee.. I'm just tickled. Thank you Shawna!
ReplyDeleteYou're welcome mommarocks.
ReplyDeleteShawna :)
I'm so confused! I can't seem to do this tutorial! I have PSP X2 and it's not loading the Glass Plug-In and I can't seem to do the gradient thing you asked ... this ones just not working for me...*sniffles*
ReplyDeleteAnother great & very easy to follow tut. Had this cracked in about 5 minutes flat. Thanks yet again hun. I've included one of your banners onto my very new & inexperienced blog if that's alright.
ReplyDeleteI'm not bothering with doing any other tuts now shhhhhhh! I'm staying here....absolutely loads to be getting on with on your blog. ((hugs)) Funky xxx
Wow, I did it! I'm terrible at following tuts and this one was super easy to follow. Thank you.
ReplyDeleteSorry Clee, i don't have x2 so i'm not sure what's up with it not loading the setting :(
ReplyDeleteShawna
Thank you Funky :)
ReplyDeleteGayle, way to go on the tut :)
Shawna :)
Thanks. I have PSPXI and it worked great :) I got the free trial of Eye Candy Impact 5.
ReplyDeleteWoW, all these fine tutorials are great. I studied all of them and I only hope I can put them to good use. You are so very talented and I so appreciate you sharing this great information with us all. God bless you and yours...always!
ReplyDeleteThank you, an awesome tutorial !!!
ReplyDeleteI like very much the results.
Kisses from Spain
awesome.. I made my first button.
ReplyDeleteThanks for the tut :)
Thanks for the marvelous posting! I quite enjoyed reading it, you could be a great author.
ReplyDeleteI will make sure to bookmark your blog and will come back
from now on. I want to encourage you to definitely continue your great posts,
have a nice day!
My page; acoustic guitar a chord
google law firm
ReplyDeletegoogle law firm
ReplyDeleteI was happy to uncover this website.I desired to thank you for this excellent read!! I definitely taking pleasure in every little bit of it and I have you added to look at out new products you article.
ReplyDeleteYou most definitely have made this blog into something special. You clearly know what you are doing, you've covered so many bases. Thanks!
ReplyDelete20150728 junda
ReplyDeletecoach outlet
ed hardy clothing uk
coach outlet online
ralph lauren uk outlet
gucci sito ufficiale
true religion
kate spade bags
michael kors handbags
christian louboutin shoes
fitflops sale
coach outlet store online
coach outlet store online
air max uk
louis vuitton sacs
kate spade outlet
coach factory outlet
louboutin pas cher
michael kors
pandora charms
nike air force 1
kate spade handbags
ray ban wayfarer
true religion jeans outlet
ed hardy clothing outlet
chanel online shop
ray ban sunglasses
hollister outlet
michael kors outlet
michael kors purse
mcm backpack
gucci handbags
michael kors handbags
louboutin
burberry scarf
oakley sunglasses outlet
tn pas cher
michael kors outlet
pandora charms
ray bans
air jordan uk
151217meiqimg
ReplyDeletelouis vuitton outlet
louis vuitton outlet
burberry outlet
mont blanc pens
uggs boots
cheap toms shoes
uggs outlet
ugg boots
ugg outlet
cheap jordans
oakley sunglasses
ray ban sunglasses
michael kors outlet online
michael kors outlet online
polo ralph lauren
ray ban wayfarer
ugg boots
louis vuitton handbags
true religion jeans
coach outlet online
ugg australia
ugg boots
michael kors handbags
oakley sunglasses wholesale
ugg outlet store
ray ban outlet
ugg boots
uggs outlet
uggs clearance
louis vuitton outlet
ugg boots for men
2016-06-10keyun
ReplyDeletelouboutin shoes
supra footwear
toms outlet
mont blanc pen
coach outlet store online clearances
michael kors outlet online
michael kors handbags
hollister shirts
christian louboutin wedges
louis vuitton outlet
oakley outlet
fitflop clearance
coach factory outlet online
ray bans
michael kors outlet online
burberry sale
longchamp handbags
christian louboutin outlet
timberlands
michael kors outlet
ralph lauren sale
jordan retro 8
adidas originals
coach outlet online
michael kors bags
giuseppe zanotti outlet
louis vuitton handbags
fitflop shoes
michael kors outlet
coach outlet online
christian louboutin shoes
michael kors handbags
louis vuitton purses
basketball shoes
oakley outlet
michael kors outlet
ray bans
ray ban outlet
louis vuitton outlet
How I have missed this page from comment. This is informative & helpful post for me. Thanks for sharing.
ReplyDeleteclipping path service
clipping path service
20161107 junda
ReplyDeleteugg canada
air jordan 13
louis vuitton
burberry outlet
celine outlet
michael kors outlet
canada goose outlet store
cheap ugg boots
cartier watches
longchamp handbags
It was a very helpful tutorial for me. Keep sharing more.
ReplyDeleteThanks for explaining Crap staff. Really Awesome Blog Thanks for Sharing.
ReplyDeleteclipping path service
ReplyDeleteYour site is very helpful
https://antiinsectsss.blogspot.com.eg/
https://antinsects.hatenablog.com/
https://anti-insect.jimdosite.com/
https://www.prokr.net/ksa/jeddah-water-leaks-detection-isolate-companies/
http://alaa-b.com/
ReplyDeletePackers and Movers Chennai Give Safe and Reliable ***Household Shifting Services in Chennai with Reasonable ###Packers and Movers Price Quotation. We Provide Household Shifting, Office Relocation, ✔✔✔ Local and Domestic Transportation Services, Affordable and Reliable Shifting Service Charges @ Packers And Movers Cheenai
ReplyDeleteشركة نقل اثاث عفش من الرياض الى جدة مكة
شركة نقل عفش من الرياض الى الدمام الاحساء الخبر الهفوف
شركة نقل عفش بالدمام
شركة نقل عفش من الرياض الى الدمام
شحن عفش من الرياض لمصر
ReplyDeletePackers and Movers Bangalore as a Services providing company can make all the difference to your ###Home Relocation experience. Bangalore based Company which offers versatile solutions, Right team that easily reduce the stress associated with a ✔✔✔Household Shifting, ***Vehicle Transportation. we help things run smoothly and reduce breakages and offer you seamless, Affordable, Reliable Shifting Services, Compare Shifting Charges. @ Packers And Movers Bangalore
Packers And Movers Akshaya Nagar
ReplyDeletePackers And Movers Amarjyothi Layout
Packers And Movers Ambalipura
Packers And Movers Amruthahalli
Packers And Movers Amrut Nagar
Packers And Movers Near Me
Packers And Movers Ahmedabad
Packers And Movers Ahmednagar
Packers And Movers Alappuzha
Packers And Movers Alwar
Packers And Movers Nagercoil
ReplyDeletePackers And Movers Nagpur
Packers And Movers Nashik
Packers And Movers Navi Mumbai
Packers And Movers Neemrana
Packers And Movers Nellore
Packers And Movers Patiala
Packers And Movers Payyanur
Packers And Movers Perumbavoor
Packers And Movers Pollachi
Packers And Movers Thrissur
ReplyDeletePackers And Movers Tirunelveli
Out Station Packers And Movers
Moving And Shifting Services
Packers And Movers Rajapalayam
Packers And Movers Adugodi
Packers And Movers Ananth Nagar
Packers And Movers Agara
Packers And Movers Agram
Packers And Movers Amarjyothi Layout
Packers And Movers Ayyappa Nagar
ReplyDeletePackers And Movers Banashankari
Packers And Movers Banaswadi
Packers And Movers Bannerghatta Road
Pakers And Movers Basavanagudi
Packers And Movers Basaveshwara Nagar
Packers And Movers Bellandur
Packers And Movers BTM Layout
Packers And Movers Bommasandara
Packers And Movers Basapura
Appreciable post, packers and movers in Bangalore keep posting these type of informative blogs.
ReplyDeleteGet the top news, scores, highlights and latest trending topics in FBS college football here at NCAA.com.For more info visit our site:Watch Ohiostate Football Live Online
ReplyDelete