


1. Start by opening up a 500 x 500 transparent image in your psp. Open up the SK Sugar Cookie texture in your psp, and set it as your background pattern, and set your foreground to null (click the round circle with the line through it under your foreground properties).
2. Set your preset shapes tool as rounded star, and hold down your shift key to draw out your shape on your transparent layer. Create as vector and Anit-alias are both checked.
3. Right click vector 1 in your layer palette, and choose "Convert to Raster Layer".
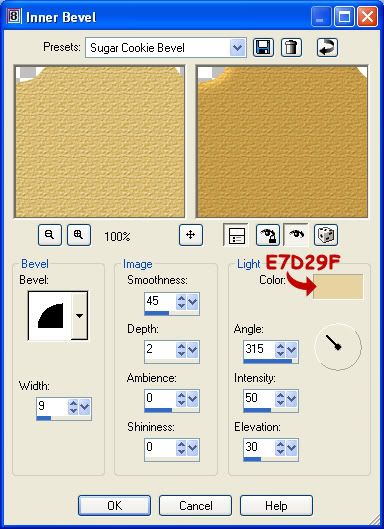
4. Go up to the "Effects" tab and choose "3D Effects", then choose "Inner Bevel", and change your settings to the same as the picture below.
Your cookie should now look like this:

For the next step, you need photoshop. If you don't have photoshop, you can give your edges a little bit of dark shading with the airbrush tool.
For those of you that have Photoshop, save your star as a .psd file and open it up in your PS program. What we are going to do here is put a slight burn around the edges to give it a more realistic look.
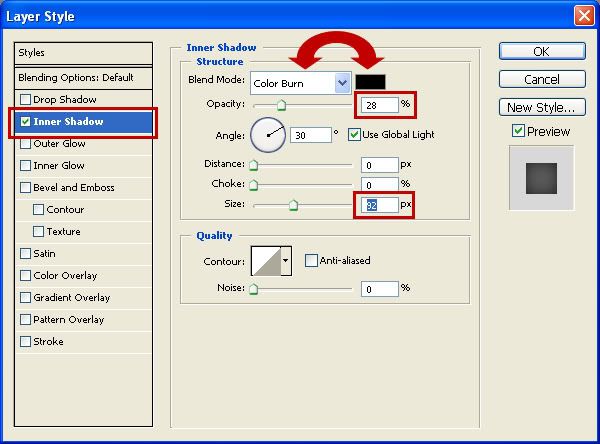
5. Click the "Layer Style" button in your layer palette to the right. It's the button that looks like a circle with an f in the middle. Choose "Inner Shadow", and change your settings to the same as the picture below.
When I saved this as a .PSD file and tried to open it up in my Paint Shop, I kept getting an error message saying this file has unsupported features and it would open up, but without the burnt edges I had just put on it. So I saved it as a .PNG next, and for whatever reason, that came out having a bit of jagged edges. I have a plugin that allows you to save files in Photoshop as .PSP files. Go Here to get it. Scroll down a bit till you see "Paint Shop Pro Format" and grab the free windows or mac version. So, whatever method you choose to use, save it and you are done your sugar cookie.
Here's the finished version:

TOU:
If you do this tutorial, your end result is yours to do whatever you wish; give it away as a freebie, use it as part of a kit, or sell it for profit. You may not make this into an action or script to give away as a freebie or to sell for a profit. A mention or a link back here would be appreciated but is not mandatory. Please do not share the supplies or tut through email or any other means, send them here to my blog to get the supplies and tut for themselves.


Your tutorials are totally awesome and the attention to detail is absolutely amazing. Love the Sugar Cookies as well as all the other outstanding tutorials. You are so generous with your talent...thank you! I do have one question, do you have a tutorial on how to make the icing to decorate the "Christmas Sugar Cookies and the Gingerbread house?" I'm looking on the net to see if I can find such a tutorial, but your's would be far superior if you have one. Again thank you so much for your generosity and for sharing your talent with us.
Annie