


* This tut gave me more trouble than any other. I had to redo it several times or more because of stupid things. If you find any mistakes, please let me know.
This tut can be done in any graphics program, but only PSP users can use the script to extend our pattern, so there's no need to download that.
Supplies:
My supplies provided are in the zip HERE.
Script: Pattern Extend by Joske: which you can get HERE. (Extract the script to your Scripts-Restricted folder wherever that may be on your computer)
Birgits Chaos: Download Here We will be using the one called Embroidery only.
1. Start off with opening up mother's day frame lightened.jpg from the provided supplies. (Make sure it is titled the lightened one and not the original)
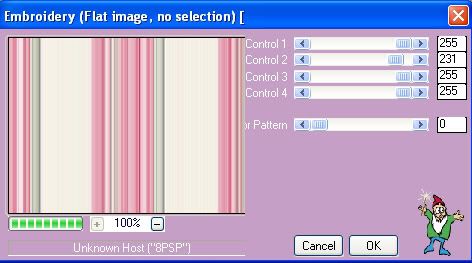
2. Go up to the Effects tab, down to Plugins, then up to Birgit's Chaos, and click on Embroidery. Use the settings in the picture below:
* I wasn't planning on turning this into a tutorial, so I didn't keep a record of any of my settings for any of this, so it may look a tad different than the page border from the kit, but not much.
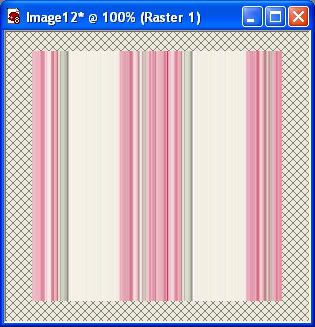
You should end up with your swatch looking like this:

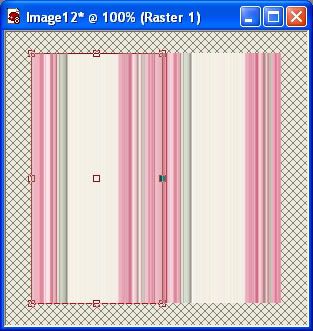
* You can leave this as is, but I found that it was too wide to make a frame and wanted something a bit thinner so I did a little cutting.
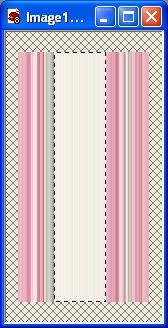
3. Pull out the edges of your canvas so you can see all sides:
4. Click on your crop tool and position it like in the picture below and crop this portion:
5. Open up Mother's Day Frame Original.jpg from the supplies and set it as your foreground pattern, Angle 0 and Scale 35.
6. Pull out the sides of your canvas again, and click the Selection tool on the left, set it to Rectangle.
7. In the layers palette, right click on your layer and choose Promote Background Layer.
8. Carefully draw out a rectangle surrounding the white portion of your swatch, then hit your delete key on your keyboard.
9. Go up to the Selections tab at the top and click on Select None.
10. Go up to the Layers tab at the top, and create a new raster layer and drag it so it is below your swatch layer.
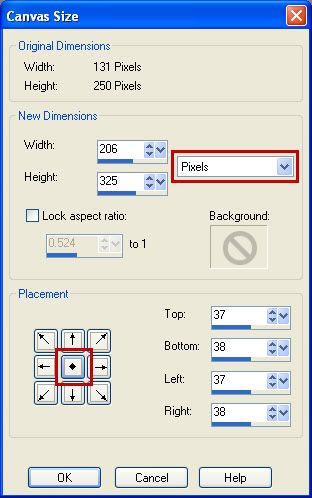
11. We need to expand our canvas for this next step, so go up to the Image tab, then down to Canvas Size.
12. Our current canvas is around 131w by 250h (give or take a few). Let's add on another 75 pixels to each. It doesn't matter if your numbers are a little off from mine, just add 75 to your dimensions. Write them down before you increase the canvas because we need to change it back later. Make sure it is set to pixels in the dropdown box, then in the New Dimensions section, change the width to 206 and the height to 325. Click on the middle box indicated by the red outlined square to set your new dimensions in place and click OK. See settings picture below:
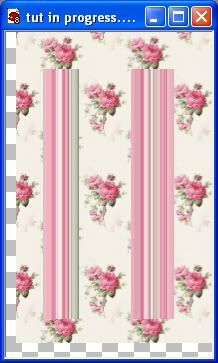
13. Click on your flood fill tool on the left and fill the blank layer we added earlier with the rose pattern.
14. Use your Mover tool to position the 3 roses evenly in the middle of the two long pink stripes. Mine looks like this at this stage:
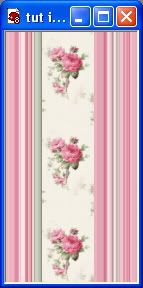
15. Now, we are going to decrease our canvas back to what it was originally. Go up to the Image tab, then down to Canvas Size. In the width and height, put in your original settings before we increased it. (or use your crop tool and crop it very closely, leaving no spaces. You should have something like this:
* You can clone out any parts of the green leaves that are sticking out from behind the 2 pink stripes if you don't like that look.
16. Right click in the layers palette and Merge Visable your 2 layers.
* Now, this is where we use the script to extend our pattern length to make page borders or in this case, a frame. Photoshop users, you are going to have to manually copy and paste to extend it vertically.
17. Go up to the menu bar at the top and in the scripts section,
 find Pattern Extend-joske from the dropdown menu, and push the play button.
18. The first box that pops up asks you to set the resolution. I set mine for 300, so put the number 3 in and hit OK.
19. The next box asks you which way you want to extend your pattern. We only want to extend our vertically, so put a number 2 in.
20. The next box asks for the new height. Choose 3 for custom.
21. Entering a number of 6.000 will extend it to 1800 pixels long. That's big enough for us for this frame, we can crop it to whatever size we wish.
22. The next popup shows us what our new dimensions will be. 131 wide by 1800 long is good. Yours may be slightly different. That's fine. Make any changes in the height or width now if you are not happy with them as they are.
23. Click OK on the next popup, and your materials palette should have poped up for you. From the patterns dropdown list, find your original striped image and change your Scale back to 100% from the 35 it was at from before and click OK.
* You should now have a seamless, extended pattern 1800 pixels long.
24. Save your stripe, then hold down your Shift key and hit the letter d on your keyboard to duplicate it and close out the original.
25. Open up an 1800 x 1800 blank page, and copy and paste your striped image onto your canvas. Rename it Original.
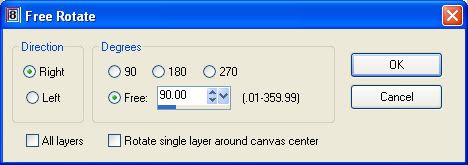
26. Select your Mover tool, and move your image down a bit from the top.
27. At this point, it is up to you how big you want your frame to be. Click your Selection tool (rectangle) and drag out the rectangle to the selected length you want your frame to be.
28. Go up to the Edit tab and choose Copy, down to Paste, then over to Paste as New Layer.
29. Go up to the Selections tab and choose Select None. This is our Left side of our frame.
30. Right click on that layer in the layer palette and rename it Left.
31. In the layer palette on the right, right click on Left layer and from the flyout choose Duplicate. This will be our Right side of the frame.
32. Right click on that layer and rename it Right and hit the eye icon next to it to turn it off for now.
33. Again, right click on Left layer and choose Duplicate. Rename this one Top, and turn off that layer.
34. Right click on Left layer again, and choose Duplicate. Rename this one Bottom and turn off that layer.
* You can also turn off the 1800 pixel layer as well.
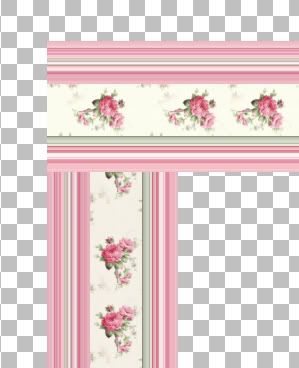
35. Move the Left layer over to the left side of your canvas, leaving about an inch or 2 of space from the edge.
36. You'll notice that we have one pink stripe a little bigger than the one with the thicker green stripe. It will look better if the thicker stripe is running along the outsides of your frame, rather than inside, so make it the active layer, and go up to the Image tab, then choose Mirror. Move it back to the left side of your canvas.
37. Unhide the layer named Top, and click it once in the layer palette to make it active, and mirror this one as well.
38. Go up to the Image tab, then to Rotate, then to Free Rotate. Use the settings below:
39. Move the layer named Top over to your Left layer, and position it so that its edges are even with the the Left layer. See pic below:
40. Click on your ERASER tool from the palette on the right, and choose the Line Left brush. Change the size to about 200 and leave the rest at it's default settings. These are PSP default brushes, so you should have them in your brush options. If you don't, you can very easily make one yourself.
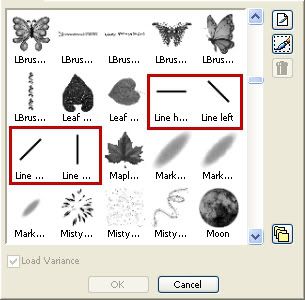
41. Position your brush like in the picture below. Make sure the brush's edge is as close as possible to the top corner of the top layer. Hold down your mouse button, and in one long stroke erase the lower portion of that image.
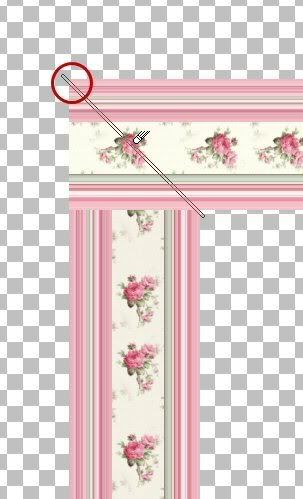
* You should now have evenly matched stripes, joining up the left side and the top. Use the Mover tool to adjust it slightly if needed, or you may need to reposition it and undo and redo if it's out of wack a lot. I also cloned out the tiny portion of the flower that was cut in half by my erasing.
* We are making a perfectly square frame here, but if you wanted a portrait frame, at this point you would take your rectangle tool and select a portion at the end of the Top layer to trim it down to the size you wanted, and then hit your delete key to get rid of it.
42. Unhide the layer named Right from the layer palette. No need to mirror this side since it is already the way we want it.
43. Repeat the same steps for erasing as you did in the top layer, but this time change the eraser brush to Line Right.
44. Unhide the layer named Bottom and click on it once to make it the active layer. Go up to the Image tab, then to Rotate, then to Free Rotate and use the same settings as before.
45. Move it to the top of the pile in the layers palette and position it into place and do the erasing again, using the appropriate Left and Right brushes.
* Before you merge your layers, if you want to clone out or clone in any partial flowers affected by our erasing, do so now. Also, take a look and see if any extra pieces are sticking out from behind any layers. If there are some, click on it's layer and erase them.
46. In the layers palette, you can delete our layer named Original, then right click on one of the layers and merge visable.
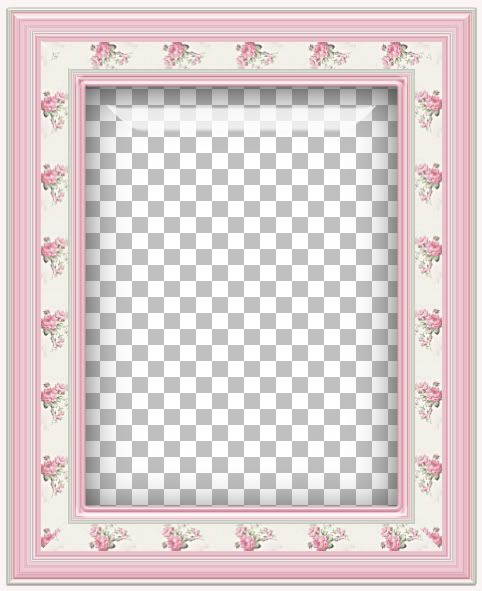
* If you've made a frame, you can also use a PSP bevel or Eye Candy bevel on it to give it a nice look.
TOU:
If you do this tutorial, your end result is yours to do whatever you wish; give it away as a freebie, use it as part of a kit, or sell it for profit. A mention or a link back here would be appreciated but is not mandatory. Please do not share the supplies or tut through email or any other means, send them here to my blog to get the supplies and tut for themselves.


Thank you again for another great tutorial Shawna. I really appreciate it.
Robin