


Supplies Needed:
Birgit's Chaos filter which you can get HERE. We will be using the one called Embroidery only.
Sample test jpg which I've zipped up and you can get HERE
Simple filters which you can get HERE. The 4 we will be using from the 10 available are: 4 way average, diamonds, center tile, and pizza slice mirror.
* Copy and paste all filters into wherever you have your PSP filter folders on your computer.
*When you are doing this tutorial and not using the sample graphic that I've provided, you need to find a photo that has some pretty colours in it. It does not matter what the photo is actually of, just the colours that are in the photo itself. I've taken a graphic I've found on the net and just cropped out a piece of the middle that has the bright, bold colours that I was looking for. Your cropped image must be square or this will not turn out properly. I've found that 250px by 250px works the best. If your photo isn't that size, crop out the part you want to use and try and get it as close to 250 pixles as you can, then just go up to the Image tab at the top, choose Resize, uncheck Lock Aspect Ratio, and enter 250 in the width and height in the Pixel Dimension section, to get it to exactly the right dimensions.
1. Open up HK.jpg from the zip file. This one is already sized 250 x 250 for you.
2. Go up to the Effects tab, down to Plugins, then find Birgit's Chaos, and click on Embroidery.
3. Increase the viewing size to 100% and change your settings to match the one's in the picture below.
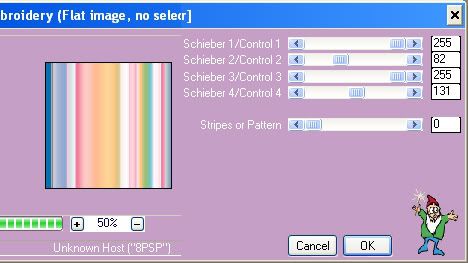
* Your graphic should have now turned into stripes like this pic.

4. Duplicate your new striped image and save the original.
* This is a seamless swatch you can now use for filling paper, tags, borders, elements ect..... Just set it as your foreground pattern in the materials box. I have made a folder called My Seamless Swatches that I keep all of these newly made fills in, along with the original graphic that i used.
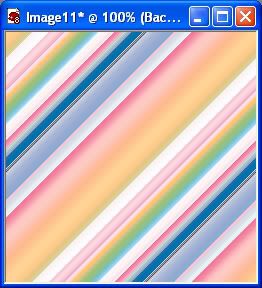
5. Working on the duplicated swatch now, go up to the Effects tab, down to Plugins, then find your Simple Filter, and from the flyout choose Diamonds. You now have a diagonal striped image to use for pattern fills.
6. Duplicate this swatch and save the original in your folder.
* Now, there are several different plugins in the Simple Filter, but the main ones that I use are 4 way average, center tile, diamonds, and pizza slice mirror. Each time you choose a new one of these to use on your swatch, it will bring up a different pattern. The pattern is determined by the combination of which of these you use on each swatch. For example, working with out diagonal pattern.....
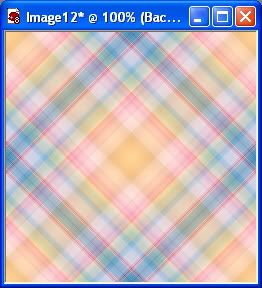
7. If you choose the 4 way average filter on the diagonal swatch, you will get this plaid pattern:
8. If you used the Center Tile filter on the diagonal swatch you will get this diamond pattern:
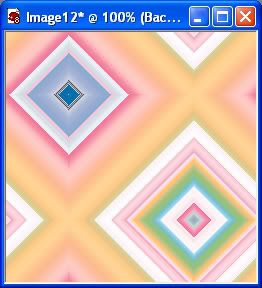
9. If you stay on the diamond pattern, and use the Diamond filter again, you get this square pattern:

I think you get the idea here. Each filter will produce a different pattern on each swatch you choose to use.
Don't forget to save the individual swatches and the original graphic you used. They come in handy when you are creating co-ordinating items for your kits.
TOU:
If you do this tutorial, your end result is yours to do whatever you wish; give it away as a freebie, use it as part of a kit, or sell it for profit. A mention or a link back here would be appreciated but is not mandatory. Please do not share the supplies or tut through email or any other means, send them here to my blog to get the supplies and tut for themselves.


What a GREAT tut and oooooh sooooo easy! *Smile* I LOVE easy! Thank you sooooo very much for taking the time to share this with all of us.