


Supplies Needed: PSP, and SK Grosgrain.bmp, which you can get HERE. Put this in your "my textures" folder in PSP.
I've found that this works best when using darker shades, as opposed to light colours.
1. Start out by opening a new transparent image the size you want your ribbon to be. Add about 50 extra pixels to the width and height of it so you have some room to work with, and because you need to crop off the ends as well, and you don't want your ribbon to come up short.
2. Set your foreground and background colour to #800000.
3. Click on your Preset Shapes tool, set it to Rectangle, Anti-alias and Create as Vector are checked, Line Style is solid, and a Width of 1, and draw out your ribbon shape.
4. In the layer palette to the right, right click on Vector 1 and choose Convert to Raster Layer.
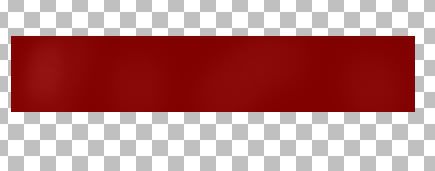
This next step will give the ribbon some light areas and is not necessary to the tutorial. I just like the look of it. If you want just a uniform colour ribbon, skip to step 6.
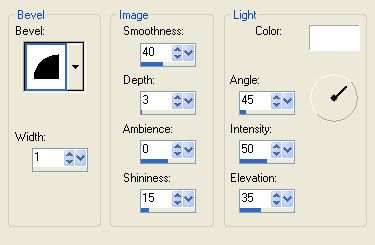
5. Click on your Lighte/Darken tool in the tool bar on the left ( its the black and white octagon icon), and use these settings:
Shape is default round brush, Size depends on the size of your ribbon, make it almost as large as the heigth of your ribbon, Hardness is 25, Step is 25, Density is 100, Thickness is 100, Rotation is 0, Opacity is 53, Mode is RBG.
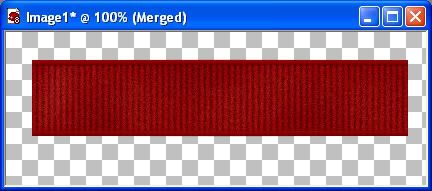
Use the lighten option to put some light spots in various places on your ribbon. See picture below as an example.
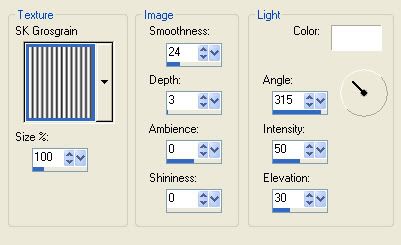
6. Go up to the Effects tab, then to Texture Effects, then to Texture and find SK Grosgrain.bmp in the texture drop down box. Use these settings:
You should have something that looks like this.
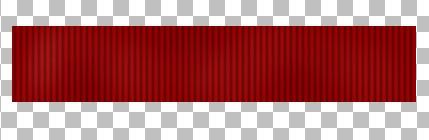
Don't be afraid to use your lighten and darken tool to give it some extra shades and highlights. Now, to make it more realistic looking, we need to give it some noise.
7. Go up to the Adjsut tab and choose Add/Remove Noise, then to Add Noise. Set it to Gaussian and check Monochrome and change the number to anywhere from 10-15, depending on what looks good to you. I've used 11 on this one.
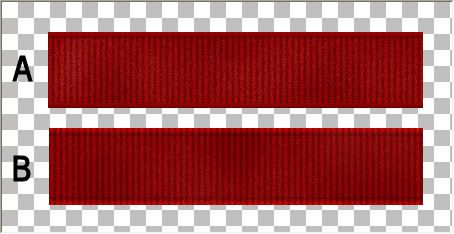
Now for the edges.... There are 2 ways of doing this. Step #8 will give you the bordered edges from picture A at the bottom, and Step #9 will give you the edges like in picture B.
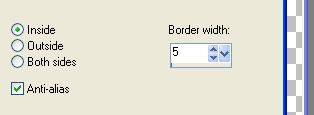
8. Go up to the Selections tab, choose Select All, up to the Selections tab again, choose Float, back up to the Selections tab and choose Defloat. Go up to the Selections tab again, choose Modify, then choose Select Selection Borders. Use these settings.
*Go up to the Layers tab and create a new layer.
Now we are going to use the Cutout effect to put a darker shade over the edges, and it gives it a beveled look.
*Go up to the Effects tab, choose 3D Effects, then choose Cutout. *When doing ribbons of another colour, for the shade colour, set it at your original colour of your ribbon, which was #800000 in this case, then change it to a few shades darker than our original.
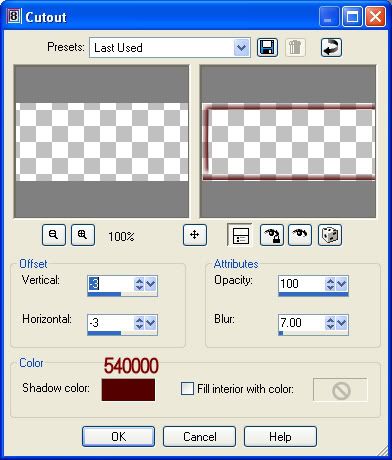
*Create a new raster layer, then go up to the Effects tab again, choose 3D Effects, then Cutout and change the vertical and horozontal from -3 to 3, and change the shade colour to #A00000. *Again, I had set it at our original ribbon colour and went a few shades lighter.
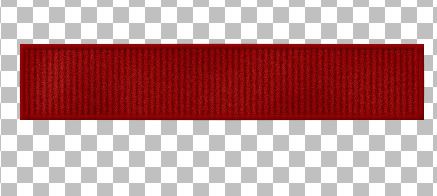
You should have something that looks like this
*Go up to the Selections tab and choose Select None.
*In the layers palette, merge all visable layers together.
*Click on your Selection tool, set it at rectangle and chop off a bit at each end so they are not so squared off. And, we are done ribbon A :)
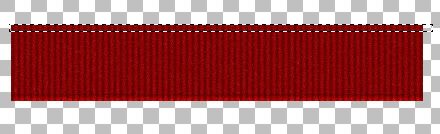
9. On the left tool bar, click on your selection tool and choose rectangle. Draw out a long rectangle on your ribbon like in the picture below.
10. Go up to the Effects tab, choose 3D Effects, and go to Inner Bevel and use these settings.
11. Go up to the Selections tab and choose Select None.
Normally, you'd just repeat the same step to get the bevel on the bottom edge as well, but it turns out to be a lighter shade than the top, so what I do is....
12. Go up to the Image tab, choose Flip, then repeat steps 9 and 10 to get the same bevel on the bottom edge.
13. Go up to the Selections tab and choose Select None.
And we're done ribbon B :)
TOU:
If you do this tutorial, your end result is yours to do whatever you wish; give it away as a freebie, use it as part of a kit, or sell it for profit. A mention or a link back here would be appreciated but is not mandatory. Please do not share the supplies or tut through email or any other means, send them here to my blog to get the supplies and tut for themselves.


Thank you for sharing this great tut.