


Supplies:
Eye Candy 5 Impact: Free trial CLICK HERE
Texturizer plugin: Download Here
My zip: swirl brush, pink rose, flower tube, green spring frame.f1s bevel Download Here
* Place the green spring frame.f1s into your EC 5 Impact bevel folder.
* Tube your 2 flower images
* Make a brush out of the swirl image.
1. Open up a 400 by 400 transparent image.
2. Set your foreground colour to #77B26E and your background to #B8D3B1.
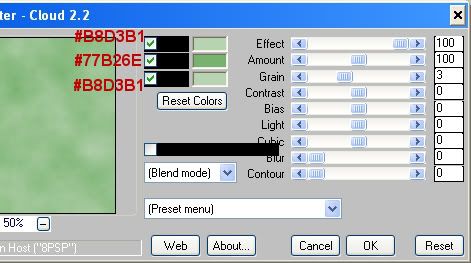
3. Go up to the Effects tab, down to Plugins, then to Mura's Meister, then choose Clouds. Use these settings:
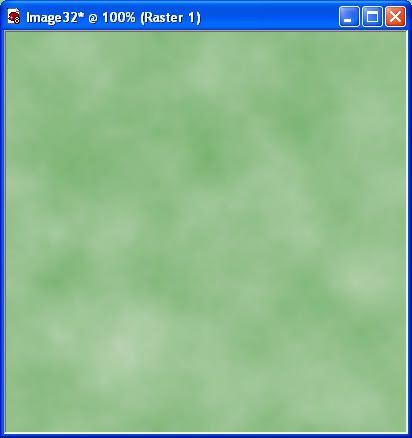
You should get something very similar to this:
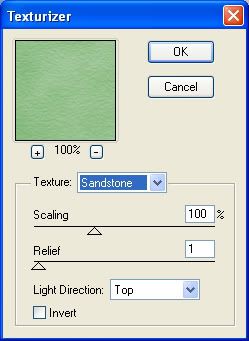
4. Go up to the Effects tab, down to Plugins, over to Texture, then choose Texturizer and use these settings:
5. Open up a new transparent canvas, as big as you want your frame to be.
6. Set your foreground and background as the green textured image we just created. Angle 0 and Scale 100.
7. Click on your Preset Shapes tool on the left and set it to Rectangle. Anti-alias is checked, create as vector is checked, line style is Solid, and a width of 1.
8. Draw out a square or rectangle the size you want your frame to be.
9. In the layers palette on the right, right click on Vector 1 and choose Convert to Raster Layer.
10. Go up to the Selections tab at the top, choose Select All, Float, then Defloat.
11. Go back to the Selections tab, down to Modify, and then to Contract. Set the number of pixels to whatever looks good to you. I'll be contracting mine by 50.
12. Hit the Delete key on your keyboard.
13. Go up to the Selections tab and choose Select None.
14. Now for the bevel. Go up to the Effects tab, down to Plugins, find Eye Candy 5 Impact, and choose Bevel.
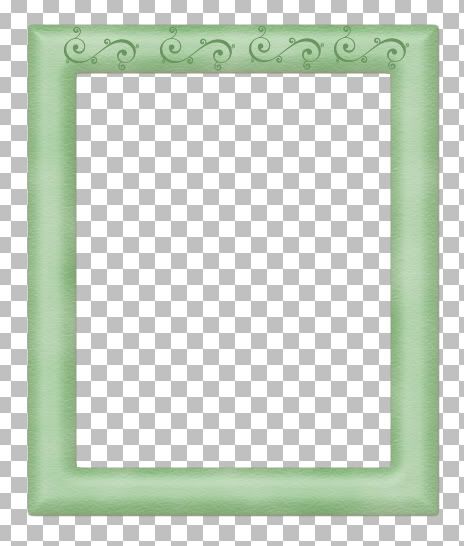
15. Find SK Green Spring Frame from the list, click it once to select it, then hit the OK button. This is what I have so far:

16. Go up to the Layers tab at the top, and choose New Raster Layer.
17. Click on your Brush tool, and from the dropdown menu, find your swirl brush from the zip. Choose a size appropriate for your frame. I'm using a size of 75 and make sure the Opacity is set to 100%.
18. Set your forground colour to #69965E.
19. On your blank layer, click down in the same spot twice to get a nice clear swirl.
20. Copy and paste as a new layer, that swirl onto your canvas 3 more times. You should always click on the Original, then copy and then paste, click on the original, then copy and paste ect..... It's just better to duplicate the original than to continuously copy a copy. (hope that made sense lol)
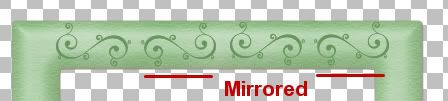
21. With your Mover tool, place each one in a row along the top portion of the frame. Don't worry if it's not even just yet, you'll be fussing with the spacing later. This is what I have so far:
22. I didn't want all of my swirls to be going the same way, so I've mirrored every second one of them. Click on the second swirl and go up to the Image tab and choose mirror. Put it back into it's place. Click on the last swirl and do the same. Here's the changes:
23. Click on your Brush tool again and change the Rotation to 85. We are not going to be copying and just rotating the first swirls we did because when you rotate something, it tends to blur and become less sharp.
24. Go up to the Layers tab and choose New Raster Layer.
25. Working on the Right side of the frame, click twice with your swirl brush.
26. Copy and paste that Original swirl 4 more times onto your canvas.
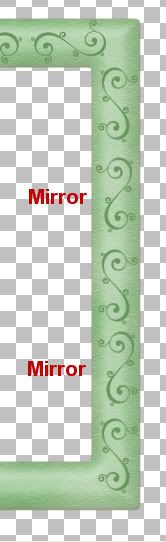
27. Again, mirror every second one of those swirls.
28. Go up to the Layers tab and choose New Raster Layer.
29. Make the swirls the same way for the Left side of your frame.
30. This time, you need to mirror the First one in line on the left side as well as the third one.
31. Click on your Brush tool again, and change the Rotation to 185.
32. Go up to the Layers tab and choose New Raster Layer.
33. Place your brush on the bottom of the frame and click in the same place twice.
34. Copy and paste that Original swirl 3 more times onto your frame and move them into place.
35. Mirror the First and Third swirls. Don't worry about the last swirl not matching up, it is going to be hidden behind our flower. So far, mine looks like this:
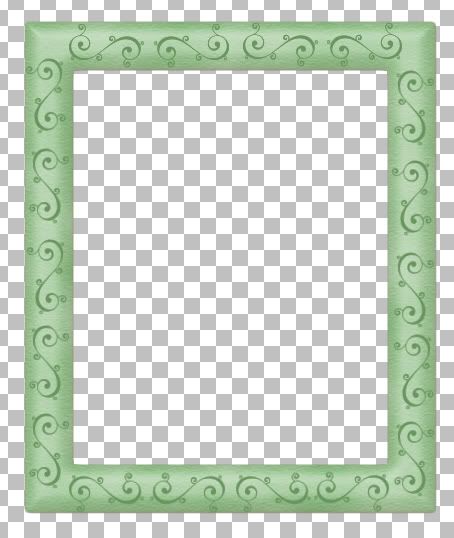
Here's where you need to even out all of your swirls. You can turn on your grid to help you out with that, but I just did mine manually.
36. When you've got all of your swirls placed the way you want them, turn off the Frame layer and Merge Visable your swirl layers.
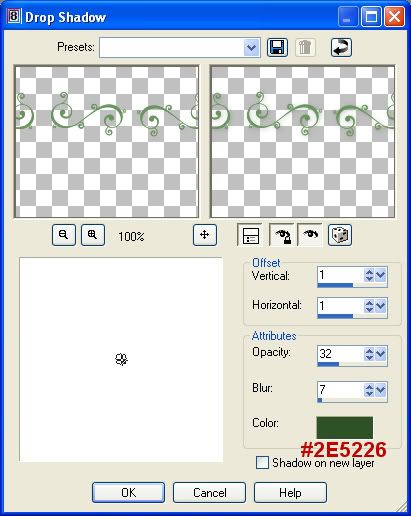
37. Now we are going to put a small drop shadow behind our swirl layer to make it a little more 3D and not so flat on the frame. Go up to the Effects tab, over to 3D Effects and then to Drop Shadow. Use these settings:
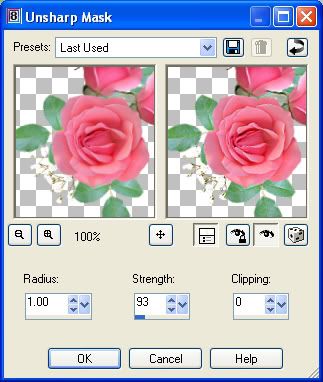
38. Click on your Picture Tube tool at the left and find the single pink rose from the zip.
39. Resize the tiny pink rose to somewhere between 15 and 20, whatever looks good to you.
40. Create a new layer over your frame image and just randomly, but evenly spaced, put some of the tiny pink roses in and around the swirls. Make sure you put each one on a new layer so that you can move them separately.
41. When you are satisfied with your placement, hide the frame and the swirl layer and merge visable all of your tiny roses.
42. Go up to the Effects tab, over to 3D Effects and then to Drop Shadow. Use the same drop shadow as in step #37, but change the colour from dark green to #221D12. Here's mine so far:
43. When done that, click on your Picture Tube tool again and find the pink roses cluster from the tube list.
44. Create a new layer again, resize the rose cluster appropriately for your frame and plop it down onto your blank layer. Move it to the bottom right hand corner of your frame. I also erased off a leaf or two and part of the baby's breath.
45. I rotated mine 80 degrees to the right, but you don't have to. Go up to the Image tab, over to Rotate, then to Free Rotate. Put the green dot beside the word Right, the dot beside the word Free and type in 80.00 and hit OK.
46. The image becomes a bit fuzzy when rotating anything, so use the Unsharp Mask to clear it up. Go up to the Adjust tab at the top, down to Sharpness, then over to Unsharp Mask. Use these settings:
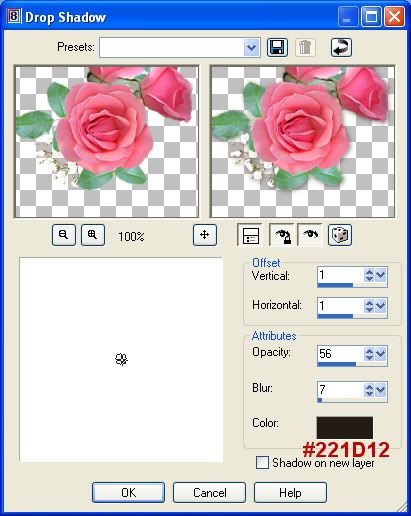
47. Give it a little shadow too. Use these settings:
48. Right click on any layer in the layer palette and Merge Visable your layers.
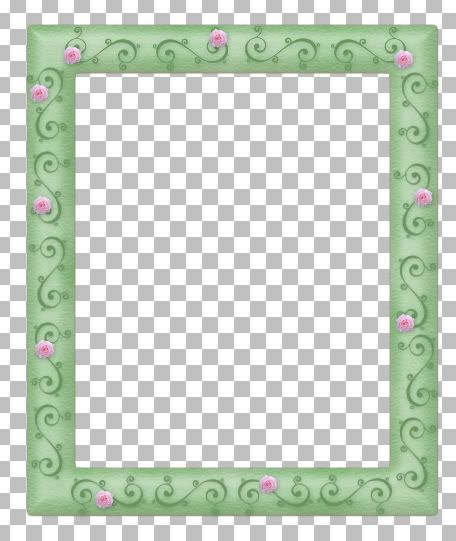
And we're done :)
TOU:
If you do this tutorial, your end result is yours to do whatever you wish; give it away as a freebie, use it as part of a kit, or sell it for profit. You may not make this into an action or script to give away as a freebie or to sell for a profit. A mention or a link back here would be appreciated but is not mandatory. Please do not share the supplies or tut through email or any other means, send them here to my blog to get the supplies and tut for themselves.
The 3 rose cluster was a random tube that was sent to me a while ago and I do not know where it came from, so it's up to you if you use it for commercial purposes.


I used my own imagination doing this one as you so often encourage us to do *s*.......thanks again sweetie, great fun. ((hugs)) xx