


Required: EyeCandy 5 Impact which you can get a free trial Here
Supplies: Here
* Place the SK Sprinkles.f1s into wherever your Eye Candy 5 Impact Bevel folder is, and the Line Style into your Styled Lines folder of PSP.
1. Open up a 200 by 200 transparent image.
2. Set your foreground and background to whatever colour you want to use for your sprinkle. I'm going to start off with #F48FAA.
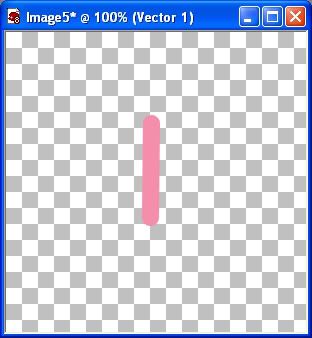
3. Click on your Pen Tool on the left. Create as vector is checked, Segment Type is Line Tool, Line Style is Rounded Ends, Anti-alias is checked and a Width of 17.
4. Drag out a line shape like the one in the picture below:
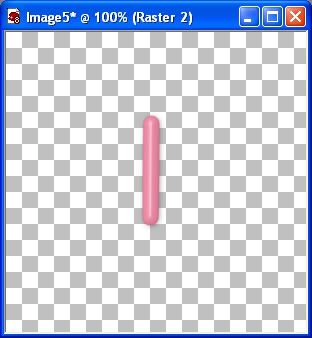
5. In the Layer Palette, right click on Vector 1 and choose Convert to Raster Layer.
6. Go up to the Effects tab at the top, down to Plugins, then find Eye Candy 5 Impact, and choose Bevel from the flyout.
7. Under the User Settings on the right hand side, look for SK Sprinkles and click it once to select it, then click the OK button.
And there you have your very first sprinkle.
8. Set your foreground and background to some other colour you'd like for another sprinkle. Let's say your going to use a christmas green #2D8F2D.
9. Follow these same steps until you get in the EC5 Impact Bevel part. Choose SK Sprinkles again, but this time, since you are using a different colour than the pink we used previously, you need to change the Shadow Colour under the Lighting tab.
You'll see that it is a medium shade of purple now. That's because we needed a dark shade for the pink we just used. Click the purple square and your colour box will pop up.
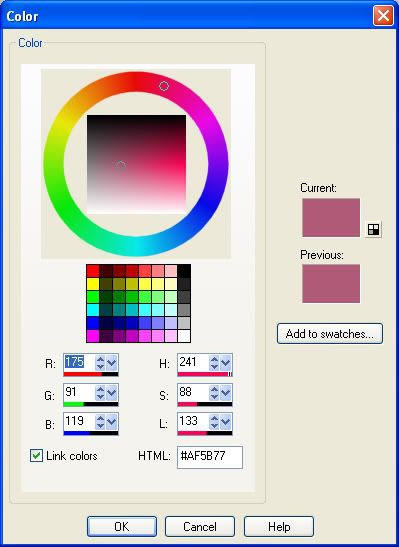
10. At the bottom you'll see HTML #AF5B77. Erase those numbers and type in the colour value numbers you've chosen for your next sprinkle, #2D8F2D.
11. See the small dot indicated by the red arrow at the top?. Place your cursor on that dot and move it upward to a dark shade of green, then hit the OK button.
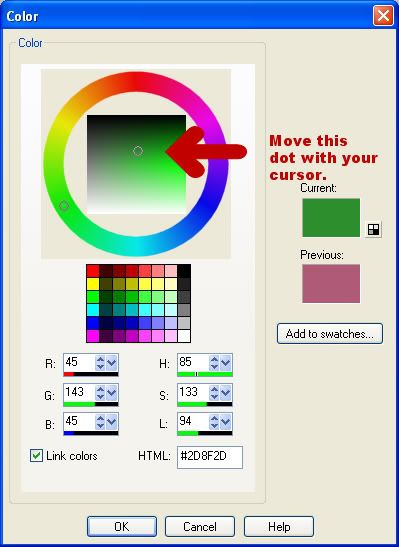
12. Take a look at your green sprinkle preview and see if you like what it looks like. If not, then go back into the shadow colour box and choose a different shade of green.colour box and choose a different green.
13. Click the OK button on the EC Bevel section when you are satisfied.
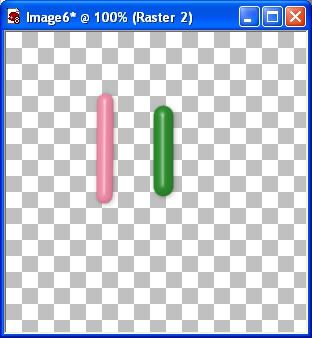
* You'll notice that I changed the width to 21 and made it shorter for my second sprinkle. Change your settings up for each. Makes for a nice variety. You can also make them slanted, diagonal, vertical ect....... For PSP users, tube them for easy resizing.
TOU:
If you do this tutorial, your end result is yours to do whatever you wish; give it away as a freebie, use it as part of a kit, or sell it for profit. You may not make this into an action or script to give away as a freebie or to sell for a profit. A mention or a link back here would be appreciated but is not mandatory. Please do not share the supplies or tut through email or any other means. If you are using this or any of my tutorials for your groups or as part of your own tutorial, please post a link to the tut on my blog and let your members download the supplies from my blog for themselves.


Thank you :)