Wednesday, October 31, 2007
Christmas Sugar Cookies
You will need for either of these 2 cookie tutorials, Paint Shop Pro and the zip file containing the 2 cookie textures. Also, Photoshop is optional, but needed for the burn around the edges. Download Cookie Textures Here

1. Start by opening up a 500 x 500 transparent image in your psp. Open up the SK Sugar Cookie texture in your psp, and set it as your background pattern, and set your foreground to null (click the round circle with the line through it under your foreground properties).
2. Set your preset shapes tool as rounded star, and hold down your shift key to draw out your shape on your transparent layer. Create as vector and Anit-alias are both checked.
3. Right click vector 1 in your layer palette, and choose "Convert to Raster Layer".
4. Go up to the "Effects" tab and choose "3D Effects", then choose "Inner Bevel", and change your settings to the same as the picture below.
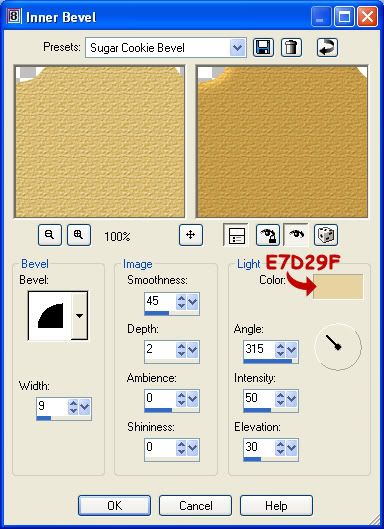
Photo Sharing and Video Hosting at Photobucket

Your cookie should now look like this:

Photo Sharing and Video Hosting at Photobucket

For the next step, you need photoshop. If you don't have photoshop, you can give your edges a little bit of dark shading with the airbrush tool.
For those of you that have Photoshop, save your star as a .psd file and open it up in your PS program. What we are going to do here is put a slight burn around the edges to give it a more realistic look.
5. Click the "Layer Style" button in your layer palette to the right. It's the button that looks like a circle with an f in the middle. Choose "Inner Shadow", and change your settings to the same as the picture below.
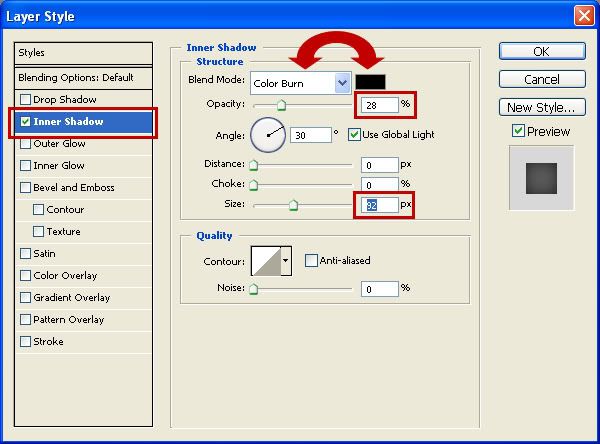
Photo Sharing and Video Hosting at Photobucket

When I saved this as a .PSD file and tried to open it up in my Paint Shop, I kept getting an error message saying this file has unsupported features and it would open up, but without the burnt edges I had just put on it. So I saved it as a .PNG next, and for whatever reason, that came out having a bit of jagged edges. I have a plugin that allows you to save files in Photoshop as .PSP files. Go Here to get it. Scroll down a bit till you see "Paint Shop Pro Format" and grab the free windows or mac version. So, whatever method you choose to use, save it and you are done your sugar cookie.

Here's the finished version:

Photo Sharing and Video Hosting at Photobucket

TOU:

If you do this tutorial, your end result is yours to do whatever you wish; give it away as a freebie, use it as part of a kit, or sell it for profit. You may not make this into an action or script to give away as a freebie or to sell for a profit. A mention or a link back here would be appreciated but is not mandatory. Please do not share the supplies or tut through email or any other means, send them here to my blog to get the supplies and tut for themselves.
 
posted by Scrap Stuff by Shawna at 5:30 PM | Permalink | 13 comments
Christmas Gingerbread Cookies
You will need for either of these 2 cookie tutorials, Paint Shop Pro and the zip file containing the 2 cookie textures. Also, Photoshop is optional, but needed for the burn around the edges. Download Cookie Textures Here


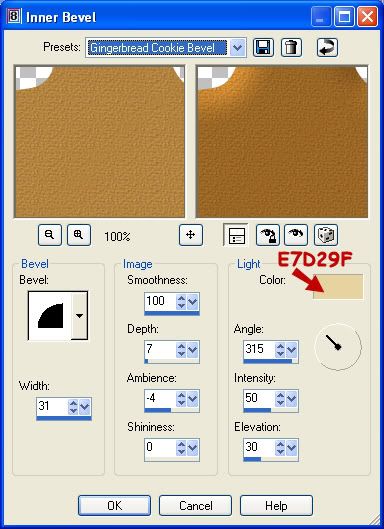
1. Start by opening up a 500 x 500 transparent image in your psp. Open up the SK Gingerbread texture in your psp, and set it as your background pattern, and set your foreground to null (click the round circle with the line through it under your foreground properties).
2. Set your preset shapes tool as rounded star, and hold down your shift key to draw out your shape on your transparent layer. Create as vector and Anit-alias are both checked.
3. Right click vector 1 in your layer palette, and choose "Convert to Raster Layer".
4. Go up to the "Effects" tab and choose "3D Effects", then choose "Inner Bevel", and change your settings to the same as the picture below.

Photo Sharing and Video Hosting at Photobucket

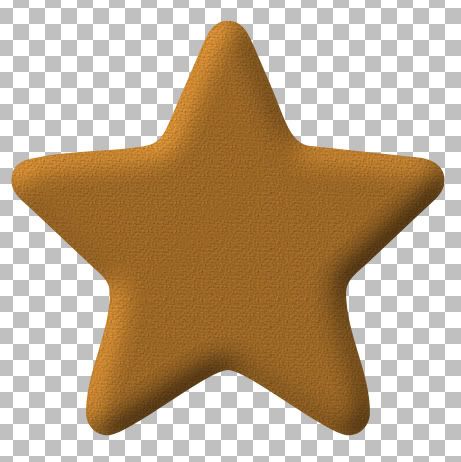
Your cookie should now look like this:

Photo Sharing and Video Hosting at Photobucket

For the next step, you need photoshop. If you don't have photoshop, you can give your edges a darker shading with the airbrush tool.
For those of you that have Photoshop, save your star as a .psd file and open it up in your PS program. What we are going to do here is put a slight burn around the edges to give it a more realistic look.
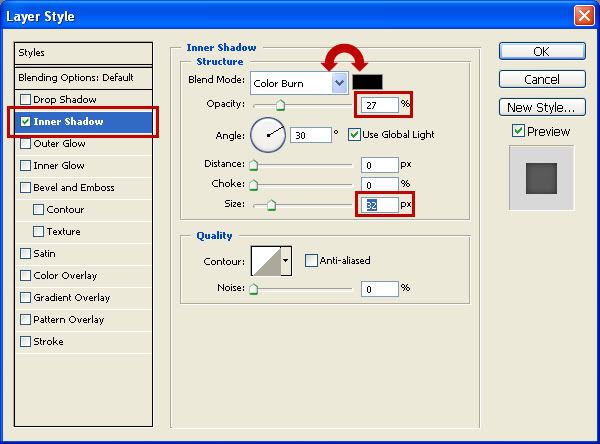
5. Click the "Layer Style" button in your layer palette to the right. It's the button that looks like a circle with an f in the middle. Choose "Inner Shadow", and change your settings to the same as the picture below.

Photo Sharing and Video Hosting at Photobucket

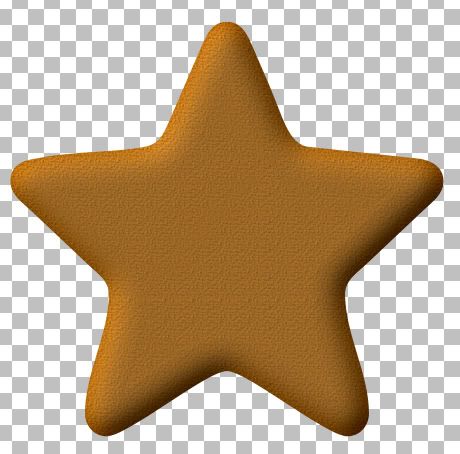
Here's the finished product:

Photo Sharing and Video Hosting at Photobucket

TOU:

If you do this tutorial, your end result is yours to do whatever you wish; give it away as a freebie, use it as part of a kit, or sell it for profit. You may not make this into an action or script to give away as a freebie or to sell for a profit. A mention or a link back here would be appreciated but is not mandatory. Please do not share the supplies or tut through email or any other means, send them here to my blog to get the supplies and tut for themselves.
 
posted by Scrap Stuff by Shawna at 5:22 PM | Permalink | 11 comments
Christmas Pattern Fill
1. Start by opening up a 200 x 200 transparent image, and a 50 x 50 transparent image as well. Hold down your shift key and hit the D key to duplicate the 50 x 50 image.
2. Set your foreground colour to #800000 and your background colour to #C00000. Then go back to your background colour and hit the "gradient" tab, and select Foreground-Background gradient, Angle 90, Repeats 1.
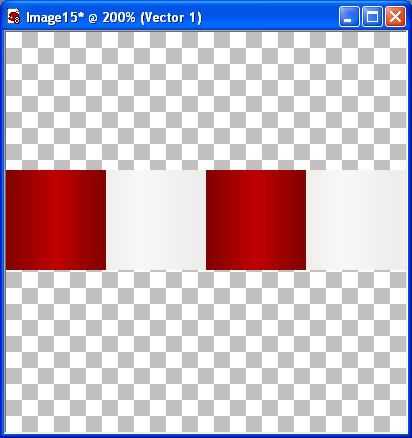
3. Fill 1 of the 50 x 50 squares with your background gradient, and fill the other with white.
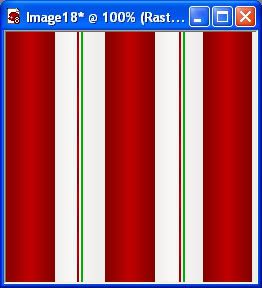
4. Click on the red square to activate it and go up to the "Edit" tab and choose "Copy". Then go to your 200 x 200 blank image and paste it in. Move it over to the left edge of your image. Repeat the above steps with the white square, then the red one, then white again, placing each square evenly with the next. Zoom in to see your image better. This is what it should look like.

Photo Sharing and Video Hosting at Photobucket

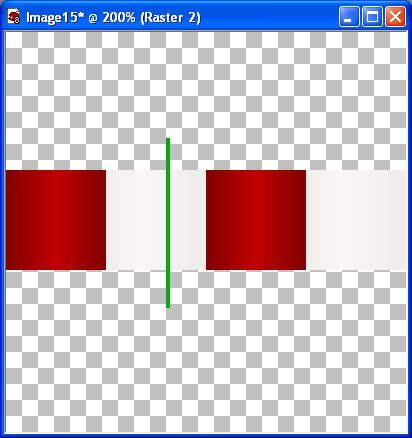
5. Next, we are going to do a green stripe. Change your foreground and background colour to #04AC04.
6. Select your pen tool, Segment Type= Line Segments, Create as vector checked, Line Width of 1 or 2 depending on the size of stripe you want, hold down your shift key and draw out a straight line that goes beyond your red and white checkers. Right click on that layer and select "Convert to raster layer". See picture below.

Photo Sharing and Video Hosting at Photobucket

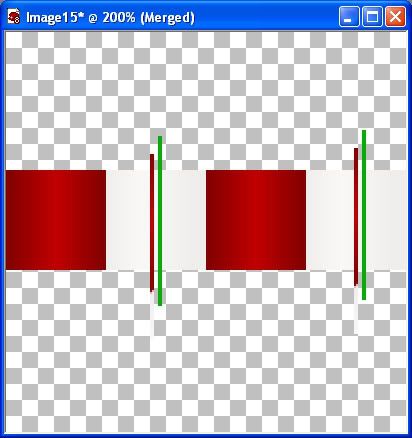
7. Set your foreground and background colour to #A00000, and follow the same above steps to get the red stripe.
8. Select your "Move" tool and place the red and green stripe side by side, evenly, on one of your white squares, then copy and paste the red and green stripes over to the other white square.

Photo Sharing and Video Hosting at Photobucket

9. In your layer palette to the right, right click on one of the raster layers and select "Merge" then "Merge Visable".
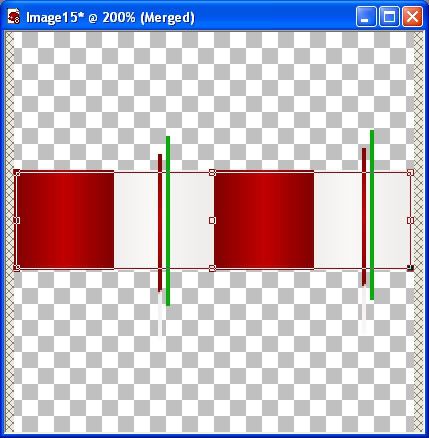
10. Pull out the edges of your image so you can see the left and right squares and crop it all around very closely. Make sure not to leave any spaces or when you try and fill an image, it will not tile properly.

Photo Sharing and Video Hosting at Photobucket

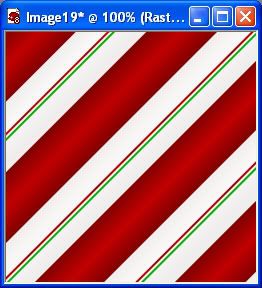
Now all you do is save it and if you want diagonal stripes, change the angle of the pattern to 45. Use it for page borders, background fills, frames ect....

Photo Sharing and Video Hosting at Photobucket

Photo Sharing and Video Hosting at Photobucket
 
posted by Scrap Stuff by Shawna at 4:57 PM | Permalink | 8 comments
Thursday, October 4, 2007
Taking a Screenshot with PSP
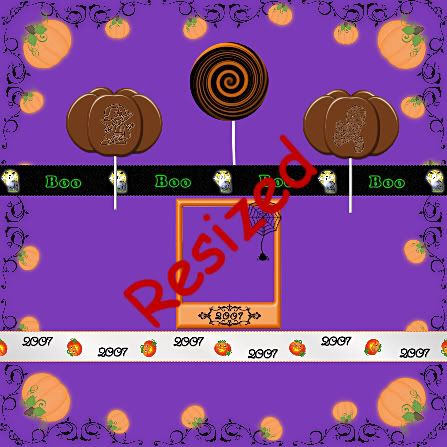
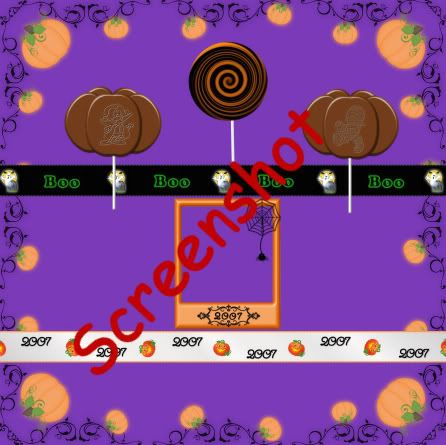
Resizing a layout vs taking a screenshot:


Photo Sharing and Video Hosting at Photobucket

Photo Sharing and Video Hosting at Photobucket

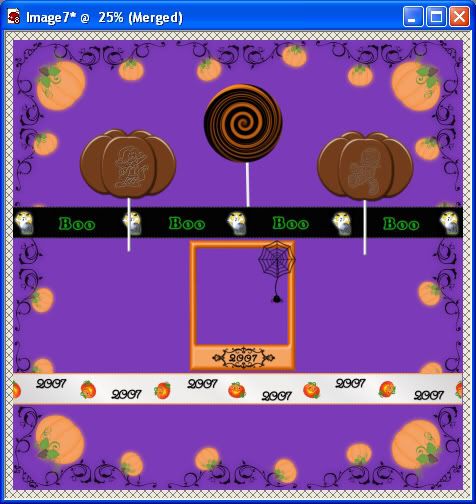
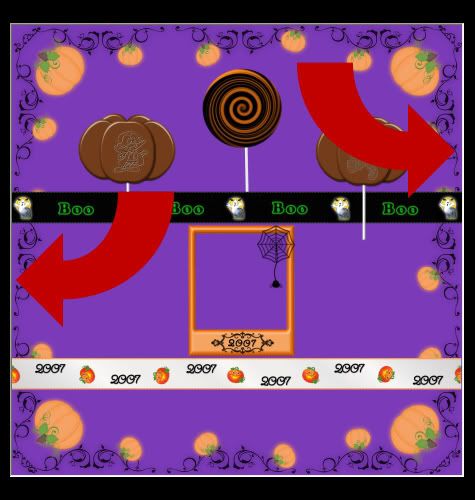
In the above first picture, I've resized my layout using the resize option in PSP. The second picture is using the screenshot option in PSP, which come out much clearer and without distorting the pixels. I use this method when I post pictures for my tutorials, or a preview of a freebie scrap kit on my blog. It comes out very clear and without any of the fuzziness that you get if you try and resize a layout instead of just using a screenshot.
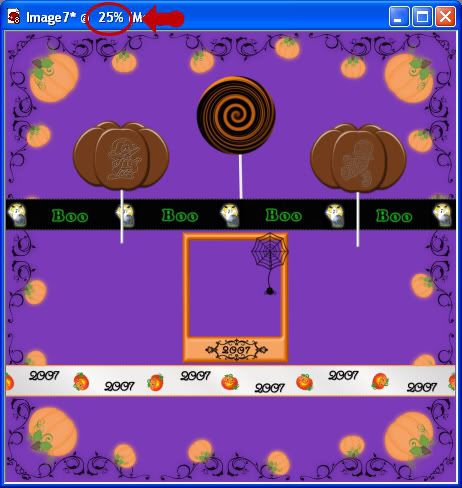
My full size layouts are usually 1800 pixels by 1800 pixels, so open up a full size background paper that you want for your preview picture of your layout, and arrange the items on the background as you would like them. I'm using parts of my freebie halloween 2007 kit for this. When you are satisfied with what you have, click inside your background paper to make sure it is active, and using your mouse scroll button, scroll downwards to decrease the appearance size of your image. I'm going to decrease it to 25%. See picture below.

Photo Sharing and Video Hosting at Photobucket


Now here comes the tricky part. In order for you to take a screenshot, you need to have paint shop pro open twice. One PSP application to take the screenshot, and your main PSP application in which you are working with. So, minimize your main PSP program now and double click the PSP icon to open up paint shop pro again. It can be confusing having 2 of them open, so what I do is, in the second application of PSP, I open up a blank 200x200 image, just to remind me that, that application is not the main one I am using, but just the blank psp for the purpose of taking the screenshot.
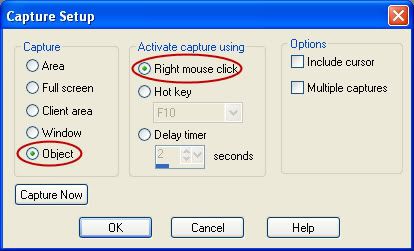
Now what we need to do is set up your screenshot settings. So, in the second PSP you have open, go up to the "File" menu, scroll down to "Import", then to "Screen Capture" and then to "Set Up". Put your settings to the picture below and click OK.

Photo Sharing and Video Hosting at Photobucket


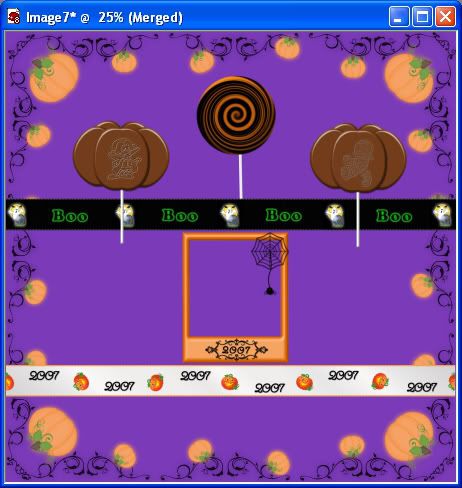
Don't minimize this PSP, just click on your main PSP application to unminimize it. At this point, we have 2 options. You need to decide if you want to take a screenshot of the entire window like in the first picture below, which includes the blue border, or of just your background image itself like the second pic.

Photo Sharing and Video Hosting at Photobucket

Photo Sharing and Video Hosting at Photobucket


First, we'll work with doing a screenshot with the blue border. Switch over to the second PSP you opened up. The one with the blank 200 x 200 image. Again, don't minimize either application of PSP or it won't work properly. Select your mover tool. We are doing this because when we click in our image, we don't want it to fill with colour or select pixels if you have some other tool already selected. Go up to the "File" menu, scroll down to "Import", then to "Screen Caputre", and then to "Set Up". Push the "Capture Now" button, and this application of PSP will automatically minimize and your main PSP screen will appear. RIGHT click inside the window on your background picture, then LEFT click on the blue border. Your screenshot will appear on your screen. Now all you do is save it.


This next part is if you do not want the blue border to appear on your picture.

Switch over to your main PSP application again. On your image, pull the top, bottom and sides out slightly like in the picture below.

Photo Sharing and Video Hosting at Photobucket

Switch over to your second blank application of PSP. Go up to the "File" menu, scroll down to "Import", then to "Screen Caputre", and then to "Set Up". Push the "Capture Now" button, and this application of PSP will automatically minimize and your main PSP screen will appear. RIGHT click inside the window on your background picture, then LEFT click again on the inside of your background image, not on the blue border. Select your crop tool and closely crop your image.

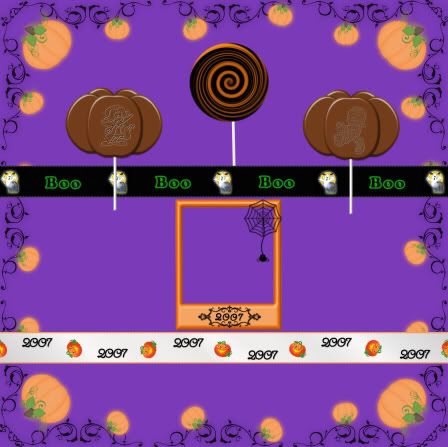
The reason we had to pull the top and bottom out is because when you do a screenshot inside the window without pulling out the top and bottom, it kind of leaves a funky border thingy around the edges like in the picture below.

Photo Sharing and Video Hosting at Photobucket

There are other ways of doing screenshots, but this is the easiest for me. It takes a bit of practice to get used to how it all works, but once you have done it a few times, you won't need to keep looking at this tut to figure it out :)
 
posted by Scrap Stuff by Shawna at 3:49 PM | Permalink | 3 comments
Making a Glass Bead in PSP
In this tutorial you will learn how to make your own glass beads using the Balls and Bubbles option in PSP.
Supplies needed: Paint Shop Pro (I'm using version 8), the jpg file called Christmas ball.jpg and a preset called x_glassbutton, if you do not have them already, you can Download Here
I do not remember where I got this preset, so if it is yours, let me know and I will give you credit for it.

Put the .jpg file into your "Environment Maps" folder. It's usually found C:\Program Files\Jasc Software Inc\Paint Shop Pro 8\Environment Maps.
Put the preset x_glassbutton into your folder called "Presets". It's usually found, C:\Program Files\Jasc Software Inc\Paint Shop Pro
8\Presets.

1. Open up a 400 by 400 transparent image. Go up to the "Effects" tab, scroll down to "Artistic Effects", and then choose "Balls and Bubbles".

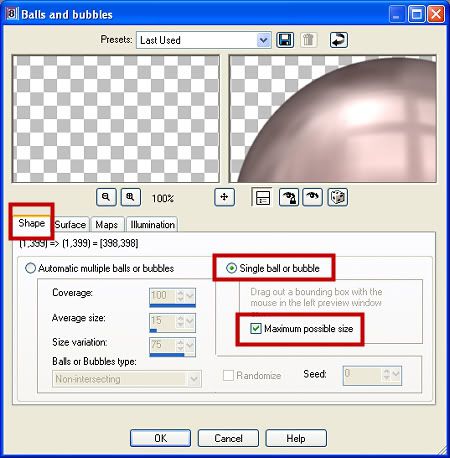
2. On this screen, make sure your "Shape" tab is selected, the green dot is in "Single ball or bubble" and a check mark is in "Maximum possible
size.

Photo Sharing and Video Hosting at Photobucket

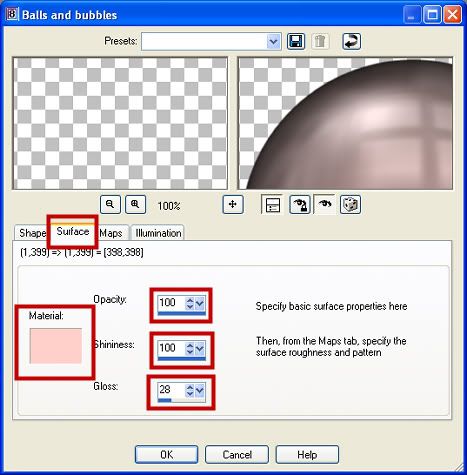
3. Next, click on the "Surface" tab. From the "Materials" window, choose the colour that you want your bead to be, (for this tutorial we are using #FFCFCA) and use the settings in the pic below.

Photo Sharing and Video Hosting at Photobucket

You can see the colour that it will be from the preview window or you can click the small "eye" icon in the balls and bubbles screen and it will put your bead onto your transparent layer. Now, I've never been able to get the particular shade that I want from just using the balls and bubbles option, so let's finish the initial bead and I'll show you how to change it to something brighter and more colourful later on.

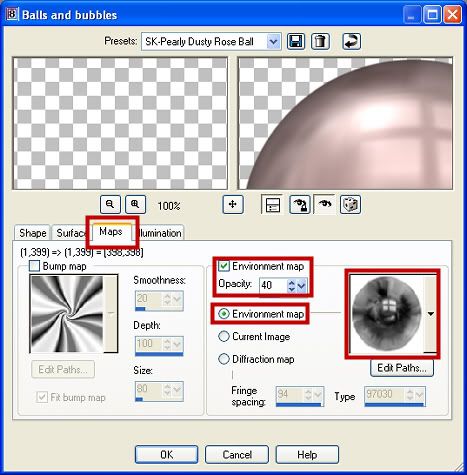
4. Next, click on the "Maps" tab. Use the settings in the picture below.

Photo Sharing and Video Hosting at Photobucket

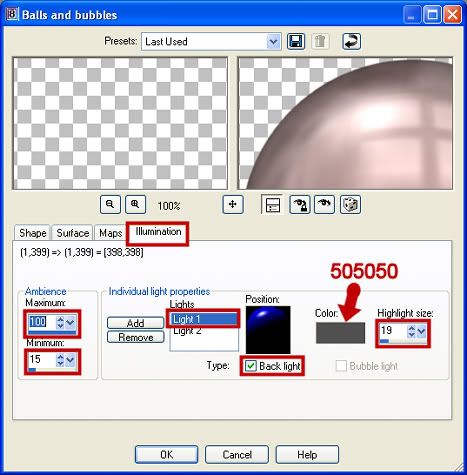
5. Next, click on the "Illumination" tab, make sure that "Light 1" is highlighted and change your settings to the picture below. If you do not have a "Light 1" in there, click on the add button to the left. If you have more than "Light 1 and Light 2" in there, highlight it and click the delete button.

Photo Sharing and Video Hosting at Photobucket

Photo Sharing and Video Hosting at Photobucket

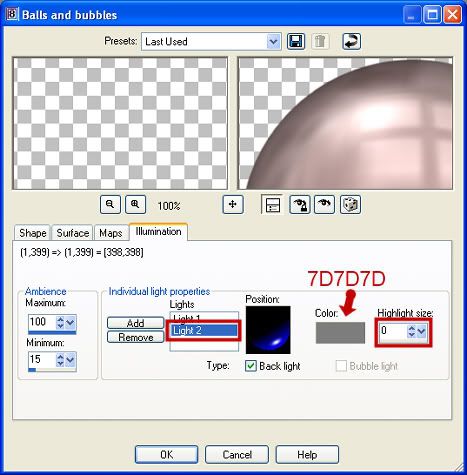
6. Now, click on "Light 2" and change your settings to the picture below.

Click OK. This is your initial bead. If you used the colour that I did in this tutorial #FFCFCA, it's probably kind of a dull rose colour, not very exciting, but I'm going to show you several different ways to change that from a previous tutorial that I had written. Click Here
 
posted by Scrap Stuff by Shawna at 3:09 PM | Permalink | 65 comments